arduino下读取MPU6050数据
参考:http://diyhacking.com/arduino-mpu-6050-imu-sensor-tutorial/
硬件
- arduino uno或arduino mega2560
- mpu6050传感器(GY-521或GY-9150)
- 杜邦线若干
连线
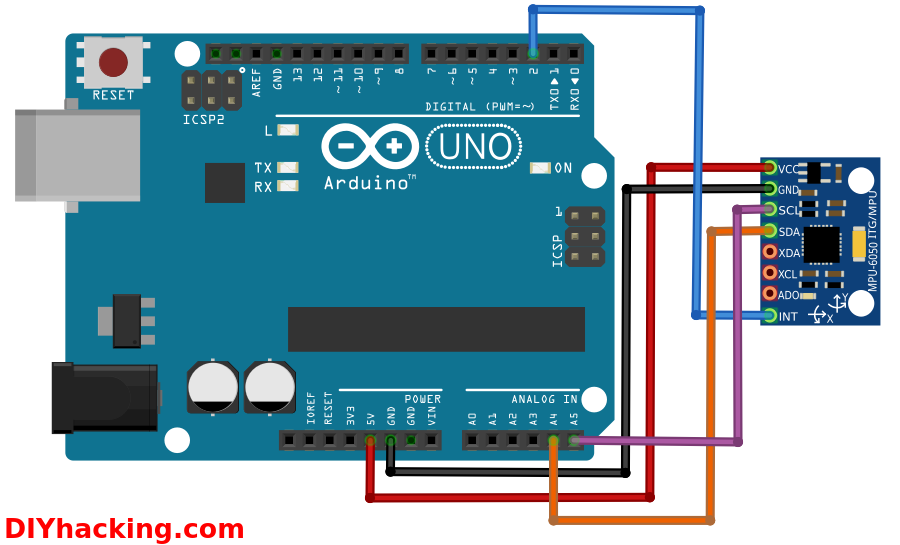
注意:如果使用arduino mega2560, mpu6050的SCL和SDA连线到arduino mega2560的pin21和pin20引脚。
程序
下载 http://diyhacking.com/projects/MPU6050.zip 和 http://diyhacking.com/projects/I2Cdev.zip,解压后放到Arduino的libraries目录下,重启Arduino.
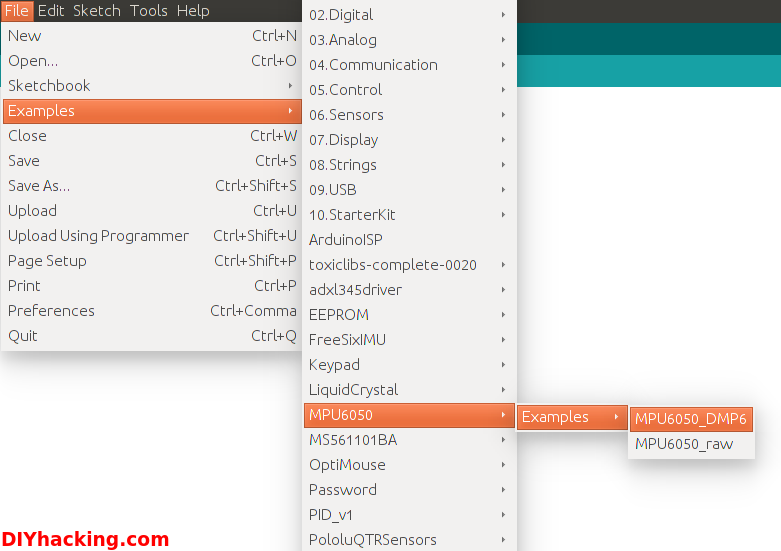
通过 File –> Examples –> MPU6050 –> Examples –> MPU6050_DMP6 打开程序并上传。
打开串口监控,设置波特率115200, 看到 “Send any character to begin DMP programming and demo: “ 时输入任意一个字符,然后发送。就能看到yaw, pitch 和roll的值,如下图所示。
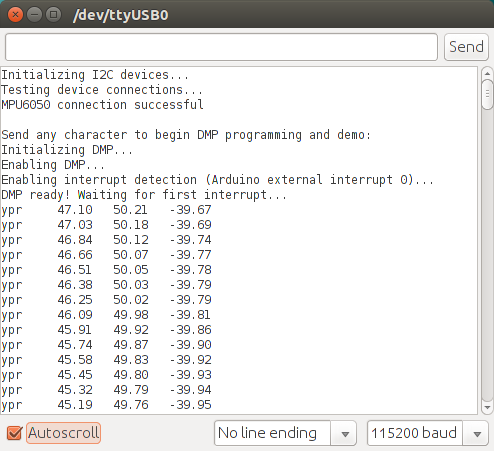
注意: 最初10秒的数据是不准确的。
如果要修正mpu6050的偏移,请参考:
http://www.i2cdevlib.com/forums/topic/96-arduino-sketch-to-automatically-calculate-mpu6050-offsets/
该脚本计算出的偏移如下:
Sensor readings with offsets:   -3  -3  16375   -1  1   -1
Your offsets:   -2341   -1472    1260   181 -22 7

Data is printed as: acelX acelY acelZ giroX giroY giroZ
Check that your sensor readings are close to 0 0 16384 0 0 0
把该偏移带入mpu6050替换下面的值:
 // supply your own gyro offsets here, scaled for min sensitivity
 mpu.setXGyroOffset(220);
 mpu.setYGyroOffset(76);
 mpu.setZGyroOffset(-85);
 mpu.setZAccelOffset(1788); // 1688 factory default for my test chip
替换后结果如下:
 // supply your own gyro offsets here, scaled for min sensitivity
 mpu.setXGyroOffset(181);
 mpu.setYGyroOffset(-22);
 mpu.setZGyroOffset(7);
 mpu.setZAccelOffset(1260); // 1688 factory default for my test chip
在ROS中应用
参考:https://github.com/fsteinhardt/mpu6050_serial_to_imu
在arduino中,新创建一个项目,复制File –> Examples –> MPU6050 –> Examples –> MPU6050_DMP6的内容,然后,注释掉”#define OUTPUT_READABLE_YAWPITCHROLL”,并把“#define OUTPUT_TEAPOT”的行前的“#”去掉,上传代码。
在ROS的工作目录下,下载和编译代码,其中imu_tools是为了添加rviz_imu_plugin,以便于在rviz中可视化。
cd ~catkin_ws/src/
git clone https:
git clone https:
sudo apt-get install ros-indigo-serial
cd ~catkin_ws/
catkin_make --pkg mpu6050_serial_to_imu imu_tools
source ~/.bashrc
运行如下命令,就可以把mpu6050的值转换为ROS的/imu 消息,同时通过rviz看到mpu6050朝向的变化。
roslaunch mpu6050_serial_to_imu demo.launch
读取IMU的角度
把/imu转化为yaw的角度,打印出来,就可以随意变更角度。 代码如下:
import PyKDL
import rospy
from sensor_msgs.msg import Imu
from nav_msgs.msg import Odometry
from geometry_msgs.msg import Twist
from math import *
import threading
import os
import subprocess
import yaml
def quat_to_angle(quat):
rot = PyKDL.Rotation.Quaternion(quat.x, quat.y, quat.z, quat.w)
return rot.GetRPY()[2]
def normalize_angle(angle):
res = angle
while res > pi:
res -= 2.0*pi
while res < -pi:
res += 2.0*pi
return res
class CalibrateRobot:
def __init__(self):
self.lock = threading.Lock()
self.sub_imu = rospy.Subscriber('imu', Imu, self.imu_cb)
self.last_imu_angle = 0
self.imu_angle = 0
while not rospy.is_shutdown():
rospy.sleep(0.1)
rospy.loginfo("imu_angle:"+str(self.imu_angle*180/3.1415926))
def imu_cb(self, msg):
with self.lock:
angle = quat_to_angle(msg.orientation)
self.imu_angle = angle
self.imu_time = msg.header.stamp
def main():
rospy.init_node('scan_to_angle')
CalibrateRobot()
if __name__ == '__main__':
main()
计算漂移
MPU6050随时间变化,是存在漂移的:即使位置不变,读取的yaw在随角度不停地变化。 如果下面脚本测出漂移的变化率,每10秒改变一次。
import PyKDL
import rospy
from sensor_msgs.msg import Imu
from nav_msgs.msg import Odometry
from geometry_msgs.msg import Twist
from math import *
import threading
import os
import subprocess
import yaml
def quat_to_angle(quat):
rot = PyKDL.Rotation.Quaternion(quat.x, quat.y, quat.z, quat.w)
return rot.GetRPY()[2]
def normalize_angle(angle):
res = angle
while res > pi:
res -= 2.0*pi
while res < -pi:
res += 2.0*pi
return res
class CalibrateRobot:
def __init__(self):
self.lock = threading.Lock()
self.sub_imu = rospy.Subscriber('imu', Imu, self.imu_cb)
self.last_imu_angle = 0
self.imu_angle = 0
while not rospy.is_shutdown():
self.last_imu_angle = self.imu_angle
rospy.sleep(10)
rospy.loginfo("imu_drift:"+str((self.imu_angle-self.last_imu_angle)*180/3.1415926))
def imu_cb(self, msg):
with self.lock:
angle = quat_to_angle(msg.orientation)
self.imu_angle = angle
self.imu_time = msg.header.stamp
def main():
rospy.init_node('scan_to_angle')
CalibrateRobot()
if __name__ == '__main__':
main()
获取的结果如下, 可以取10次取平均数。
[INFO] [WallTime: 1463810774.132861] imu_drift:0.0549391295367
[INFO] [WallTime: 1463810784.137872] imu_drift:0.0553483626062
[INFO] [WallTime: 1463810794.148451] imu_drift:0.0763623061112
[INFO] [WallTime: 1463810804.158945] imu_drift:0.0360694372181
[INFO] [WallTime: 1463810814.169398] imu_drift:0.0550469979142
[INFO] [WallTime: 1463810824.179115] imu_drift:0.0455562992295
[INFO] [WallTime: 1463810834.189545] imu_drift:0.0409165927309
[INFO] [WallTime: 1463810844.190111] imu_drift:0.0600102750276
[INFO] [WallTime: 1463810854.200587] imu_drift:0.0612612484692
[INFO] [WallTime: 1463810864.206757] imu_drift:0.0342962911961
[INFO] [WallTime: 1463810874.209526] imu_drift:0.0712592774024
[INFO] [WallTime: 1463810884.213722] imu_drift:0.0702398006237
校正误差
imu_delta = 2*pi + normalize_angle(imu_end_angle - imu_start_angle) - imu_drift*(imu_end_time - imu_start_time).to_sec()
rospy.loginfo('Imu error: %f percent'
imu_result = imu_delta/scan_delta
如何标定–turtlebot_calibration
- http://wiki.ros.org/turtlebot_calibration
- http://wiki.ros.org/turtlebot_calibration/Tutorials/Calibrate%20Odometry%20and%20Gyro
- https://github.com/turtlebot/turtlebot_apps/tree/indigo/turtlebot_calibration
- http://blog.csdn.net/u013453604/article/details/49358721
TODO
MPU 6050 calibration can be done using the Energia code, which is used to display the raw values of the sensor mentioned in
Chapter 6, Working with Robotic Sensors . This example is already available in Energia examples. You will get this code by
navigating to File/Examples/MPU 6050/Examples/MPU 6050_raw . Load this sketch into Energia and follow the procedure given
here:
1. Place the MPU 6050 breakout board on a flat surface. We can use an inclinometer to check the inclination of the surface.
2. Modify the current program by setting the offset to zero. We can set the offset of three axes values of gyroscope to 0
using the following function:
(“setXGyroOffset , setYGyroOffset , setZGyroOffset” =0)
3. Upload the raw code to Launchpad and take the Energia serial monitor to confirm whether the serial data is coming from
the Launchpad. Leave the breakout for 5 to 10 minutes to allow the temperature to stabilize and read the gyro values and
note down the values.
4. Set the offset values to the readings noted and upload the code again to the Launchpad.
5. Repeat this procedure until we get a reading of 0 from each gyro axis.
6. After achieving the goal, we finally get the offsets that can be used for future purposes.
Todo
raspberry pi下mpu9150
http://blog.csdn.net/crazyquhezheng/article/details/44463651
本文内容由网友自发贡献,版权归原作者所有,本站不承担相应法律责任。如您发现有涉嫌抄袭侵权的内容,请联系:hwhale#tublm.com(使用前将#替换为@)