基于ROS的车道线检测项目记录

2023-05-16

2020.09.06

任务:传统OpenCV方法ROS版本改造

选取大神陈光的高级车道线检测方法进行改造,总体逻辑是:
第一、创建订阅者,接收摄像头发布的数据,用cv_bridgeopencv格式的数据转换为ROS的消息格式数据。
第二、创建发布者,将检测到的数据以特定的消息类型发布出去
传统方法的难点
(1)对光照、明暗、车道线磨损、非常敏感
(2)在十字路口转弯时,摄像头检测不到前方车道线,会造成绿色区域“变幻莫测”地跳动
(3)总会出现x expect non zero vector错误,导致程序退出
计划对程序的改进
(1)在十字路口等工况下检测不到车道线时,直接returnspin()函数,等待下一帧数据
(2)在进入np.polyfit()函数进行二次曲线拟合时,先判断参数是否为空
(3)在画面上打印FPS本车距离坐车道线的距离

问题记录

#!/usr/bin/env python
# coding=utf-8
import os
import cv2
import matplotlib.pyplot as plt
import numpy as np
from moviepy.editor import VideoFileClip
import glob
import time
import math
import os
os.environ["CUDA_VISIBLE_DEVICES"] = "0"
import rospy
from sensor_msgs.msg import Image
from cv_bridge import CvBridge, CvBridgeError

#################################################################
# Step 3 : Warp image based on src_points and dst_points(透视变换)
#################################################################
# The type of src_points & dst_points should be like
# np.float32([ [0,0], [100,200], [200, 300], [300,400]])
def warpImage(image, src_points, dst_points):
    image_size = (image.shape[1], image.shape[0])
    M = cv2.getPerspectiveTransform(src_points, dst_points)#src_points到dst_points的投影矩阵
    Minv = cv2.getPerspectiveTransform(dst_points, src_points)#逆投影矩阵
    #flags=cv2.INTER_LINEAR对远离摄像头的部分进行线性插值填充像素点
    warped_image = cv2.warpPerspective(image, M,image_size, flags=cv2.INTER_LINEAR)
    return warped_image, M, Minv
#################################################################
# Step 4 : 提取车道线
#################################################################
def hlsLSelect(img, thresh=(220, 255)):  #HLS通道图,对L(亮度)处理,提取白色车道线
    hls = cv2.cvtColor(img, cv2.COLOR_BGR2HLS)  #print(hls.shape),(1080,1920,3)
    l_channel = hls[:,:,1]  #print(l_channel.shape),(1080,1920)
    #np.max(l_channel),求矩阵中最大的元素,125.#数据的缩放
    l_channel = 255*(l_channel/np.max(l_channel))  #np.max(l_channel)=255.0
    binary_output = np.zeros_like(l_channel)  #创建一个空矩阵,黑图片
    binary_output[(l_channel > thresh[0]) & (l_channel <= thresh[1])] = 1  #在阈值范围内的点亮
    ###cv2.imshow("whitelane",binary_output)  
    ###cv2.waitKey(0) 
    return binary_output
def labBSelect(img, thresh=(195, 255)):#转为Lab通道的图,随后对b通道进行分割处理,提取图像中黄色的车道线
    # 1) Convert to LAB color space
    lab = cv2.cvtColor(img, cv2.COLOR_BGR2Lab)
    lab_b = lab[:,:,2]
    # don't normalize if there are no yellows in the image
    if np.max(lab_b) > 100:#162
        lab_b = 255*(lab_b/np.max(lab_b))#print(np.max(lab_b)),255.0
    # 2) Apply a threshold to the L channel
    #print(lab_b)
    binary_output = np.zeros_like(lab_b)
    binary_output[((lab_b > thresh[0]) & (lab_b <= thresh[1]))] = 1
    ###cv2.imshow("yellolane",binary_output)
    ###cv2.waitKey(0)
    # 3) Return a binary image of threshold result
    return binary_output
#################################################################
# Step 5 : Detect lane lines through moving window(检测车道线)
#################################################################
def find_lane_pixels(binary_warped, nwindows, margin, minpix):
    # Create an output image to draw on and visualize the result,可视化
    out_img = np.dstack((binary_warped, binary_warped, binary_warped))
    # Take a histogram of the bottom half of the image,计算图像下半部分每列上白色像素点之和,shape[0]=1080,//是整除,图像的左上角是坐标原点
    histogram = np.sum(binary_warped[binary_warped.shape[0]//2:,:], axis=0)
    # Find the peak of the left and right halves of the histogram
    # These will be the starting point for the left and right lines
    midpoint = np.int(histogram.shape[0]//2)##midpoint = 960
    leftx_base = np.argmax(histogram[:midpoint])#左车道线起始点,0到960范围内,像素之和最大的横坐标
    rightx_base = np.argmax(histogram[midpoint:]) + midpoint#右车道线起始点
    
    # Set height of windows - based on nwindows above and image shape
    window_height = np.int(binary_warped.shape[0]//nwindows)
    # Identify the x and y positions of all nonzero pixels in the image返回非0元素的索引值
    nonzero = binary_warped.nonzero()
    nonzeroy = np.array(nonzero[0])
    nonzerox = np.array(nonzero[1])
    # Current positions to be updated later for each window in nwindows
    leftx_current = leftx_base
    rightx_current = rightx_base

    # Create empty lists to receive left and right lane pixel indices
    left_lane_inds = []
    right_lane_inds = []

    # Step through the windows one by one
    for window in range(nwindows):
        # Identify window boundaries in x and y (and right and left)
        win_y_low = binary_warped.shape[0] - (window+1)*window_height
        win_y_high = binary_warped.shape[0] - window*window_height
        win_xleft_low = leftx_current - margin##margin是滑动窗口宽度的一半
        win_xleft_high = leftx_current + margin
        win_xright_low = rightx_current - margin
        win_xright_high = rightx_current + margin
        
        # Draw the windows on the visualization image
        cv2.rectangle(out_img,(win_xleft_low,win_y_low),
        (win_xleft_high,win_y_high),(0,255,0), 2) 
        cv2.rectangle(out_img,(win_xright_low,win_y_low),
        (win_xright_high,win_y_high),(0,255,0), 2) 
        #cv2.imshow("out_img", out_img)
        #cv2.waitKey(0)
        
        # Identify the nonzero pixels in x and y within the window 
        good_left_inds = ((nonzeroy >= win_y_low) & (nonzeroy < win_y_high) & 
        (nonzerox >= win_xleft_low) &  (nonzerox < win_xleft_high)).nonzero()[0]
        good_right_inds = ((nonzeroy >= win_y_low) & (nonzeroy < win_y_high) & 
        (nonzerox >= win_xright_low) &  (nonzerox < win_xright_high)).nonzero()[0]
        #print(good_left_inds)
        #print(good_right_inds)
        # Append these indices to the lists
        left_lane_inds.append(good_left_inds)
        right_lane_inds.append(good_right_inds)
        
        # If you found > minpix pixels, recenter next window on their mean position
        if len(good_left_inds) > minpix:
            leftx_current = np.int(np.mean(nonzerox[good_left_inds]))
        if len(good_right_inds) > minpix:        
            rightx_current = np.int(np.mean(nonzerox[good_right_inds]))

    # Concatenate the arrays of indices (previously was a list of lists of pixels)
    try:
        left_lane_inds = np.concatenate(left_lane_inds)
        right_lane_inds = np.concatenate(right_lane_inds)
    except ValueError:
        # Avoids an error if the above is not implemented fully
        pass

    # Extract left and right line pixel positions
    leftx = nonzerox[left_lane_inds]
    lefty = nonzeroy[left_lane_inds] 
    rightx = nonzerox[right_lane_inds]
    righty = nonzeroy[right_lane_inds]

    return leftx, lefty, rightx, righty, out_img

def fit_polynomial(binary_warped, nwindows=9, margin=100, minpix=50):
    # Find our lane pixels first
    leftx, lefty, rightx, righty, out_img = find_lane_pixels(
        binary_warped, nwindows, margin, minpix)
    print('leftx:', leftx)
    print('lefty:', lefty)
    print('rightx:', rightx)
    print('righty:', righty)
    # Fit a second order polynomial to each using `np.polyfit`
    if len(leftx) == 0 or len(rightx) == 0:
        out_img=0
        left_fit=np.array([0, 0, 0])
        right_fit=np.array([0, 0, 0])
        ploty=0
        return out_img, left_fit, right_fit, ploty
    left_fit = np.polyfit(lefty, leftx, 2)
    right_fit = np.polyfit(righty, rightx, 2)

    # Generate x and y values for plotting
    ploty = np.linspace(0, binary_warped.shape[0]-1, binary_warped.shape[0] )
    #try:
    ##    left_fitx = left_fit[0]*ploty**2 + left_fit[1]*ploty + left_fit[2]
    ##    right_fitx = right_fit[0]*ploty**2 + right_fit[1]*ploty + right_fit[2]
    ##except TypeError:
    ##    # Avoids an error if `left` and `right_fit` are still none or incorrect
    ##    print('The function failed to fit a line!')
    ##    left_fitx = 1*ploty**2 + 1*ploty
    ##    right_fitx = 1*ploty**2 + 1*ploty

    ## Visualization ##
    # Colors in the left and right lane regions
    out_img[lefty, leftx] = [255, 0, 0]
    out_img[righty, rightx] = [0, 0, 255]

    # Plots the left and right polynomials on the lane lines
    #plt.plot(left_fitx, ploty, color='yellow')
    #plt.plot(right_fitx, ploty, color='yellow')
    print('left shape:', left_fit.shape)
    print('left type:', type(left_fit))
    return out_img, left_fit, right_fit, ploty
#################################################################
# Step 6 : Track lane lines based the latest lane line result(跟踪车道线)
#################################################################
def fit_poly(img_shape, leftx, lefty, rightx, righty):
     ### TO-DO: Fit a second order polynomial to each with np.polyfit() ###
    left_fit = np.polyfit(lefty, leftx, 2)
    right_fit = np.polyfit(righty, rightx, 2)
    # Generate x and y values for plotting
    ploty = np.linspace(0, img_shape[0]-1, img_shape[0])
    ### TO-DO: Calc both polynomials using ploty, left_fit and right_fit ###
    left_fitx = left_fit[0]*ploty**2 + left_fit[1]*ploty + left_fit[2]
    right_fitx = right_fit[0]*ploty**2 + right_fit[1]*ploty + right_fit[2]
    
    return left_fitx, right_fitx, ploty, left_fit, right_fit

def search_around_poly(binary_warped, left_fit, right_fit):
    # HYPERPARAMETER
    # Choose the width of the margin around the previous polynomial to search
    # The quiz grader expects 100 here, but feel free to tune on your own!
    margin = 60

    # Grab activated pixels
    nonzero = binary_warped.nonzero()
    nonzeroy = np.array(nonzero[0])
    nonzerox = np.array(nonzero[1])
    
    ### TO-DO: Set the area of search based on activated x-values ###
    ### within the +/- margin of our polynomial function ###
    ### Hint: consider the window areas for the similarly named variables ###
    ### in the previous quiz, but change the windows to our new search area ###
    left_lane_inds = ((nonzerox > (left_fit[0]*(nonzeroy**2) + left_fit[1]*nonzeroy + 
                    left_fit[2] - margin)) & (nonzerox < (left_fit[0]*(nonzeroy**2) + 
                    left_fit[1]*nonzeroy + left_fit[2] + margin)))
    right_lane_inds = ((nonzerox > (right_fit[0]*(nonzeroy**2) + right_fit[1]*nonzeroy + 
                    right_fit[2] - margin)) & (nonzerox < (right_fit[0]*(nonzeroy**2) + 
                    right_fit[1]*nonzeroy + right_fit[2] + margin)))
    
    # Again, extract left and right line pixel positions
    leftx = nonzerox[left_lane_inds]
    lefty = nonzeroy[left_lane_inds] 
    rightx = nonzerox[right_lane_inds]
    righty = nonzeroy[right_lane_inds]

    # Fit new polynomials
    left_fitx, right_fitx, ploty, left_fit, right_fit = fit_poly(binary_warped.shape, leftx, lefty, rightx, righty)
    
    ## Visualization ##
    # Create an image to draw on and an image to show the selection window
    out_img = np.dstack((binary_warped, binary_warped, binary_warped))*255
    window_img = np.zeros_like(out_img)
    # Color in left and right line pixels
    out_img[nonzeroy[left_lane_inds], nonzerox[left_lane_inds]] = [255, 0, 0]
    out_img[nonzeroy[right_lane_inds], nonzerox[right_lane_inds]] = [0, 0, 255]

    # Generate a polygon to illustrate the search window area
    # And recast the x and y points into usable format for cv2.fillPoly()
    left_line_window1 = np.array([np.transpose(np.vstack([left_fitx-margin, ploty]))])
    left_line_window2 = np.array([np.flipud(np.transpose(np.vstack([left_fitx+margin, 
                              ploty])))])
    left_line_pts = np.hstack((left_line_window1, left_line_window2))
    right_line_window1 = np.array([np.transpose(np.vstack([right_fitx-margin, ploty]))])
    right_line_window2 = np.array([np.flipud(np.transpose(np.vstack([right_fitx+margin, 
                              ploty])))])
    right_line_pts = np.hstack((right_line_window1, right_line_window2))

    # Draw the lane onto the warped blank image
    cv2.fillPoly(window_img, np.int_([left_line_pts]), (0,255, 0))
    cv2.fillPoly(window_img, np.int_([right_line_pts]), (0,255, 0))
    result = cv2.addWeighted(out_img, 1, window_img, 0.3, 0)
    
    # Plot the polynomial lines onto the image
    #plt.plot(left_fitx, ploty, color='yellow')
    #plt.plot(right_fitx, ploty, color='yellow')
    ## End visualization steps ##
    
    return result, left_fit, right_fit, ploty

#################################################################
# Step 7 : CalculateDistFromCenter
#################################################################
def CalculateDistFromCenter(binary_image, left_fit, right_fit):
    img_size = (binary_image.shape[1], binary_image.shape[0])
    dist_from_center = 0.0
    # assume the camera is centered in the vehicle
    ###camera_pos = img_size[1] / 2
    if right_fit is not None:
        if left_fit is not None:
            # 摄像头位于图像中间,也是本车的中心
            camera_pos = img_size[0] / 2
            ###RESUBMIT - END
            
            # find where the right and left lanes intersect the bottom of the frame          
            # 左右车道线最底端x坐标
            left_lane_pix = np.polyval(left_fit, binary_image.shape[0])
            right_lane_pix = np.polyval(right_fit, binary_image.shape[0])
            # 左右车道线中点x坐标
            center_of_lane_pix = (left_lane_pix + right_lane_pix) / 2
            # 摄像头(本车中心)与车道线中心的距离
            dist_from_center = (camera_pos - center_of_lane_pix) * 3.7/1280
            #print(dist_from_center, 'm')

    return  dist_from_center

#################################################################
# Step 8 : Draw lane line result on undistorted image(逆透视变换)
#################################################################
def drawing(undist, bin_warped, color_warp, left_fitx, right_fitx, ploty, Minv):
    # Create an image to draw the lines on
    warp_zero = np.zeros_like(bin_warped).astype(np.uint8)
    color_warp = np.dstack((warp_zero, warp_zero, warp_zero))

    # Recast the x and y points into usable format for cv2.fillPoly()
    pts_left = np.array([np.transpose(np.vstack([left_fitx, ploty]))])
    pts_right = np.array([np.flipud(np.transpose(np.vstack([right_fitx, ploty])))])
    pts = np.hstack((pts_left, pts_right))

    # Draw the lane onto the warped blank image
    cv2.fillPoly(color_warp, np.int_([pts]), (0,255, 0))

    # Warp the blank back to original image space using inverse perspective matrix (Minv)
    newwarp = cv2.warpPerspective(color_warp, Minv, (undist.shape[1], undist.shape[0])) 
    # Combine the result with the original image
    result = cv2.addWeighted(undist, 1, newwarp, 0.3, 0)
    return result

#################################################################
# Step 9 : show text
#################################################################
def overlay_text_on_image (image, dist_from_center, fps):
    
    new_img = np.copy(image)
    
    font = cv2.FONT_HERSHEY_SIMPLEX
    font_color = (255,255,255)
    num_format = '{:04.2f}'

    text = 'FPS: ' + str(fps)
    cv2.putText(new_img, text, (40,70), font, 1.5, font_color, 2, cv2.LINE_AA)
        
    direction = 'left'
    if dist_from_center > 0:
        direction = 'right'
    abs_dist = abs(dist_from_center)
    text = 'Vehicle is ' + num_format.format(abs_dist) + ' m ' + direction + ' of center'
    cv2.putText(new_img, text, (40,120), font, 1.5, font_color, 2, cv2.LINE_AA)
    
    return new_img

###-------------------------------------------------------------------------------------------###
# 左图梯形区域的四个端点,从左上端点开始顺时针方向
src = np.float32([[603, 342], [727, 342], [1150, 720], [225, 720]])
wrap_offset = 150
# 右图矩形区域的四个端点
dst = np.float32([[225+wrap_offset, 0], [1150-wrap_offset, 0], [1150-wrap_offset, 720], [225+wrap_offset, 720]])

bridge = CvBridge()
detected = False
##left_fit = []
##right_fit = []
##ploty = []


def callbackFunc(image):
    rospy.loginfo('receive frame success')
    global bridge, src, dst, detected
    try:
	undistort_image = bridge.imgmsg_to_cv2(image, "bgr8")
    except CvBridgeError as e:
        print(e) 

    start = time.time()
    #步骤3-透视变换
    warp_image, M, Minv = warpImage(undistort_image, src, dst)
    ###cv2.imshow("warp_image",warp_image)
    ###cv2.waitKey(0)
    #步骤4-提取车道线
    hlsL_binary = hlsLSelect(warp_image)
    labB_binary = labBSelect(warp_image, (205, 255))
    combined_binary = np.zeros_like(hlsL_binary)
    combined_binary[(hlsL_binary == 1) | (labB_binary == 1)] = 1
    ###cv2.imshow("combined_binary",combined_binary)
    ###cv2.waitKey(0)
    left_fit = []
    right_fit = []
    ploty = []
    if detected == False:#步骤5-滑动窗口检测车道线
        out_img, left_fit, right_fit, ploty = fit_polynomial(combined_binary, nwindows=9, margin=80, minpix=40)
        ###cv2.imshow("out_img",out_img)
        ###cv2.waitKey(0)
        ###if (len(left_fit) > 0 & len(right_fit) > 0) :
        if left_fit[0] == 0 and left_fig[1] == 0:
            detected = False
            return
        else :
            detected = True
    else:#步骤6-追踪车道线
        track_result, left_fit, right_fit, ploty,  = search_around_poly(combined_binary, left_fit, right_fit)
        if (len(left_fit) > 0 & len(right_fit) > 0) :
            detected = True
        else :
            detected = False
            return

    end = time.time()
    fps = math.floor(1 / (end - start))

    # step 7-CalculateDistFromCenter
    dist_from_center = CalculateDistFromCenter(warp_image, left_fit, right_fit)

    #步骤8-逆透视变换 and drawing 
    left_fitx = left_fit[0]*ploty**2 + left_fit[1]*ploty + left_fit[2]
    right_fitx = right_fit[0]*ploty**2 + right_fit[1]*ploty + right_fit[2]
    result = drawing(undistort_image, combined_binary, warp_image, left_fitx, right_fitx, ploty, Minv)

    #step 9-show text 
    result = overlay_text_on_image (result, dist_from_center, fps)
    
    cv2.imshow("result",result)
    cv2.waitKey(40)
         
def msg_subscriber():
    rospy.init_node('msg_subscriber', anonymous=True)
    rospy.Subscriber('/miivii_gmsl_ros/camera3', Image, callbackFunc)
    rospy.spin()

if __name__ == '__main__':
    msg_subscriber()

(1)追踪车道线的函数中,计算left_lane_inds时出现数组下标溢出错误
(2)提取车道线的颜色空间阈值还没有调整

2020.09.07

任务:深度学习方法检测车道线

1、AdamShan大神将MaybeShewill-CV/lanenet-lane-detection改造成为ROS 版本。

2、权重文件有2版:MaybeShewill作者发的一版,在网上下载的一版,tensorflow模型介绍了怎么加载模型

3、执行程序前要修改launch文件里的权重路径,只包含.index .data .meta等后缀前面的前缀。

问题记录

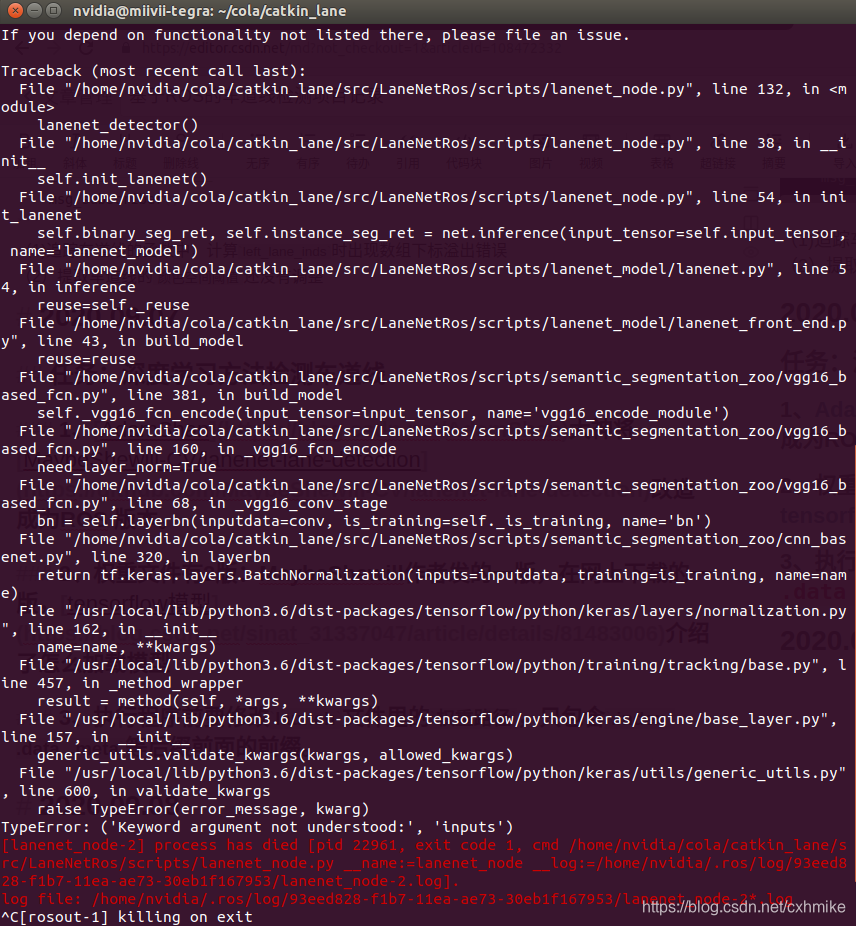
1、执行程序时由于tensorflow等软件的版本不匹配,出现各种warning:...已过期,用...代替,照着一个一个修改,最后也没全部改完,不改了。。。

2、如图,还没解决

2020.09.08

任务:英伟达JetsonPak车道线检测例程,Autoware

1、看了例程视频,是在车道线上画点,有的稀疏有的稠密,也会在路两边栏杆、汽车上画点,效果不好,不用。

2、Autoware还没有安装

2020.09.09

任务:安装Autoware

1、总体安装参考官网教程,其中安装qt5参考教程1和教程2

2、安装配置eigen参考教程,其中下载安装包的步骤参考教程

2020.09.19

问题记录

1、autoware暂时没有安装成功

2、看了autoware的感知和路径规划框架,它用的不是从摄像头读取数据进行车道线检测的,摄像头只用来做物体检测。

成果

1、与论文对应的ultra-fast-lane-detection项目跑通了,在miivii域控制器(基于Xavier)上复现Ultra-Fast-Lane-Detection源论文项目

计划

  • 1、onnx模型项目运行
  • 2、tensorRT加速项目,miivii域控制器(Xavier)实现TensorRT加速后的Ultra-Fast-Lane-Detection项目
  • 3、换自己采集的视频检测
  • 4、改造为ROS版本

2020.10.15

痛苦如此持久,像蜗牛充满耐心地移动;快乐如此短暂,像兔子的尾巴掠过秋天的草原。

国庆节前一天刷了JetPack4.4,终于运行通了车道线检测的tensorRT加速项目,惊喜之余心凉凉,发现darknet_ros因为OpenCV版本的问题编译不通,于是对OpenCV千般改造miivii域控制器(Xavier)配置ROS与OpenCV3.x.x,运行成功darknet_ros后,发现域控制器自带的GMSL摄像头驱动又编译不通,昨天休整了半天,对目前的困境进行了小结:
JetPack4.4下有4项任务:(1)启动GMSL摄像头(2)demo检测行人、车辆和自行车(3)检测交通标志(4)检测车道线
(1)和(2)的程序依赖刷机时提供的动态库,因此必须用初始的默认版本OpenCV4.1.1。昨天验证了(4),在OpenCV3.2.0和4.1.1下都能运行。我查了一些资料后,发现(3)darknet_ros只在OpenCV3.x.x下运行正常,4.x.x下问题很多,昨晚上github,发现有人尝试在4.x.x下编译darknet_ros,Opencv4, now working #202,结论是将darknet_ros/下的darknet替换为AlexeyAB/darknet,后者在OpenCV2/3/4下都能编译。于是将OpenCV改回4.1.1,尝试编译AlexeyAB/darknet。

2020.10.16

AlexeyAB/darknet编译运行成功,替换darknet_ros下的darknet后,catkin_make失败。
用kunaltyagi/darknet替换darknet_ros下的darknet,参照OpenCV4 compilation success修改相应文件,catkin_make仍失败。

本文内容由网友自发贡献,版权归原作者所有,本站不承担相应法律责任。如您发现有涉嫌抄袭侵权的内容,请联系:hwhale#tublm.com(使用前将#替换为@)

基于ROS的车道线检测项目记录 的相关文章

  • ros 样例代码和教程

    中国大学MOOC 机器人操作系统入门 课程代码示例 代码 https github com DroidAITech ROS Academy for Beginners 书 https legacy gitbook com book sych
  • 使用WTGAHRS2(JY-GPSIMU)在ROS中读取数据并发布话题

    目录 IMU简介 驱动程序 IMU串口通信协议 程序 效果 IMU简介 十轴惯性导航传感器WTGAHRS2传感器集成高精度的陀螺仪 加速度计 地磁场传感器 GPS 模块 采用高性能的微处理器和先进的动力学解算与卡尔曼动态滤波算法 能够快速求
  • ROS中使用VLP16激光雷达获取点云数据

    ROS中使用VLP16激光雷达获取点云数据 个人博客地址 本文测试环境为 Ubuntu20 04 ROS Noetic 需要将激光雷达与PC连接 然后在设置 gt 网络 gt 有线中将IPv4改为手动 并且地址为192 168 1 100
  • SLAM-hector_slam 简介与使用

    hector slam功能包使用高斯牛顿方法 不需要里程计数据 只根据激光信息便可构建地图 所以他的总体框架如下 hector slam功能包 hector slam的核心节点是hector mapping 它订阅 scan 话题以获取SL
  • 无人驾驶论坛

    1 百度Apollo论坛 http www 51apollo com 2 人工智能中文资讯网 http www ailab cn
  • V-REP安装

    小知识 是当前目录 是父级目录 是根目录 1 下载V REP 官网地址 http www v rep eu downloads html 我用ubuntu16 04下载V REP PRO EDU V3 5 0 Linux tar 2 解压安
  • ROS学习(1)——ROS1和ROS2的区别

    因为机器人是一个系统工程 它包括了机械臂结构 电子电路 驱动程序 通信框架 组装集成 调试和各种感知决策算法等方面 任何一个人甚至是一个公司都不可能完成机器人系统的研发工作 但是我们又希望自己能造出一个机器人跑一跑 验证一下自己的算法 所以
  • Ubuntu镜像下载地址

    镜像地址https launchpad net ubuntu cdmirrors
  • GG-CNN代码学习

    文章目录 1 源码网址 https github com dougsm ggcnn 2 数据集格式转化 下载后的康奈尔数据集 解压完之后里面的格式 里面的 tiff图像通过 txt文件转化得到 python m utils dataset
  • Ubuntu下vscode配置ROS环境

    摘要 最近准备放弃用clion开发ROS使用更主流的vscode 整理一下在ubuntu18 04下的VSCode安装和ROS环境配置流程 安装 方法一 软件商店安装 个人还是推荐使用ubuntu软件下载vscode 简单不容易出错 方法二
  • ModuleNotFoundError: No module named ‘rosbag‘

    1 ModuleNotFoundError No module named rosbag File opt ros kinetic lib python2 7 dist packages roslib launcher py line 42
  • Hypervisor介绍及在智能驾驶的应用

    转自Hypervisor 智能座舱和智能驾驶融合的关键技术 腾讯新闻
  • ROS1 ROS2学习

    ROS1 ROS2学习 安装 ROS ROS1 ROS2 命令行界面 ROS2 功能包相关指令 ROS 命令行工具 ROS1 CLI工具 ROS2 CLI工具 ROS 通信核心概念 节点 Node 节点相关的CLI 话题 Topic 编写发
  • roslaunch error: ERROR: cannot launch node of type

    今天在因为github上有个之前的包更新了 重新git clone后出现了一个问题 ERROR cannot launch node of type crazyflie demo controller py can t locate nod
  • 如何将从 rospy.Subscriber 数据获得的数据输入到变量中?

    我写了一个示例订阅者 我想将从 rospy Subscriber 获得的数据提供给另一个变量 以便稍后在程序中使用它进行处理 目前 我可以看到订阅者正在运行 因为当我使用 rospy loginfo 函数时 我可以看到打印的订阅值 虽然我不
  • 如何将视频或图像序列转换为包文件?

    我是 ROS 新手 我需要转换预先存在的视频文件 或者large可以连接到视频流中的图像数量 bagROS 中的文件 我在网上找到了这段代码 http answers ros org question 11537 creating a ba
  • 在 CLion 中设置 ROS 包

    我正在使用 CLion C IDE 来编辑 ROS 包 我可以通过打开CMakeLists txt文件 但是 我收到一个错误 FATAL ERROR find package catkin 失败 在工作区和 CMAKE PREFIX PAT
  • ROS安装错误(Ubuntu 16.04中的ROS Kinetic)

    中列出的步骤顺序http wiki ros org kinetic Installat 已被关注 尝试在Ubuntu 16 04中安装ROSkinetic 输入以下命令时出错 sudo apt get install ros kinetic
  • catkin_make 编译报错 Unable to find either executable ‘empy‘ or Python module ‘em‘...

    文章目录 写在前面 一 问题描述 二 解决方法 参考链接 写在前面 自己的测试环境 Ubuntu20 04 一 问题描述 自己安装完 anaconda 后 再次执行 catkin make 遇到如下问题 CMake Error at opt
  • ROS中spin和rate.sleep的区别

    我是 ROS 新手 正在尝试了解这个强大的工具 我很困惑spin and rate sleep功能 谁能帮助我了解这两个功能之间的区别以及何时使用每个功能 ros spin and ros spinOnce 负责处理通信事件 例如到达的消息

随机推荐

  • C语言结构体字节对齐规则

    注 xff1a 图片中蓝色圆圈表示空闲的字节空间 xff0c 黄色表示成员占有的字节空间 编译器一般默认4字节对齐 xff0c 当然也有8字节对齐的 xff0c 但是如果结构体没有使用8字节的数据类型 xff0c 其实也可以认为是4字节对齐
  • c语言输出对齐的方法

    关于c语言输出对其方法 左对齐右对齐附乘法表代码 左对齐 当输出多个数据时 xff0c 由于每个数据的字符长度不同 xff0c 所以需要对齐 xff0c 左对齐时方法如下 xff1a span class token function pr
  • 多线程与网络编程

    一 网络协议 应用层 HTTP FTP TFTP SMTP SNMP DNS 传输层 TCP UDP 网络层 ICMP IGMP IP ARP RARP 数据链路层 由底层网络定义的协议 物理层 由底层网络定义的协议 二 TCP与UDP x
  • const和define区别与比较

    xff08 1 xff09 就起作用的阶段而言 xff1a define是在编译的预处理阶段起作用 xff0c 而const是在编译 运行的时候起作用 xff08 2 xff09 就起作用的方式而言 xff1a define只是简单的字符替
  • FreeRTOS中任务栈内存分配

    前言 在RAM中大多数的空间分配为任务栈和系统栈两部分 任务栈 xff1a 顾名思义就是用来跑任务的 xff0c 当我们xTaskCreate一个任务时 xff0c 但是在这块任务栈里面动态分配空间 系统栈 xff1a 任务栈是不使用这里的
  • 网络编程(0816-林雪阵)

    完成seclect TCP客户端 include lt stdio h gt include lt sys types h gt include lt sys socket h gt include lt arpa inet h gt in
  • yolov5获取边框坐标

    这里使用的是5 0版本 打开detect py xff0c 找到 Write results模块 xff0c 找到 save one box ctr 43 鼠标点击 xff0c 进入general py xff0c 会自动定位到 save
  • ROS介绍以及常用指令

    ROS 1 什么是ros ROS 的雏形诞生 xff1a 斯坦福大学人工智能实验室的STAIR 机器人项目这个项目希望完成一个服务机器人原型 xff0c 在视觉的辅助下 xff0c 可以在复杂环境中运动 xff0c 还可以通过机械臂操控环境
  • 基于ROS的YOLOV3实现目标检测项目过程记录

    2020 08 07 问题记录 1 要命的darknet ros 整体逻辑是用yolo检测出目标 然后通过ros节点将目标类别和位置信息发布出来 因此选择ros darknet 2个问题 1 依赖opencv和boost boost库安装过
  • 【Jetson目标检测SSD-MobileNet应用实例】(五)根据输出的检测结果,使用串口和STM32配合进行电机控制

    Jetson目标检测SSD MobileNet应用实例 xff08 一 xff09 win11中配置SSD MobileNet网络训练境搭建 Jetson目标检测SSD MobileNet应用实例 xff08 二 xff09 制作自己的数据
  • QT5.14串口调试助手:上位机接收数据解析数据帧+多通道波形显示+数据保存为csv文件

    由于业务需要 xff0c 在上个月做了一个关于qt的设计 xff0c 在设计中主要需要解决的问题就是接收单片机采集到的数据并在上位机将数字实时的通过波形显示出来 xff0c 然后上位机要有保存下数据文件的功能 xff0c 便于后续的软件读取
  • 如何使用Cmake编译

    目录 一 Cmake是一种跨平台编译工具 二 CMake说明 三 编写CMakeList txt 四 使用 cmake 一 Cmake是一种跨平台编译工具 比make更高级 xff0c 使用起来要方便得多 CMake主要是编写CMakeLi
  • 51单片机串口通信篇

    串行通信 基本介绍波特率通信校验内部结构 并行通信串行通信串行通信方式同步通信异步通信 串行口的控制寄存器SCON寄存器PCON寄存器中断源及优先级 串口通信配置步骤 相关程序简单例程1简单例程2 基本介绍 单片机通信是指单片机和单片机 或
  • 0基础学会 UDP通信(内附C语言源码)

    include lt sys types h gt include lt sys socket h gt ssize t sendto int socketfd const void buf size t len int flags con
  • C++ --头文件和类的声明

    函数 function 是为了处理数据 数据的实质就是变量 xff08 variables xff09 C是所有的函数都可以去处理任意声明的变量 C 43 43 面向对象的编程思想就是 把函数名和变量名封装起来 xff08 也就是类 xff
  • gcc编译可执行文件和cmake编译可执行文件

    gcc编译 gcc的下载 xff08 下载mingw xff0c 里面包含gcc xff09 下载安装MinGW w64详细步骤 xff08 c c 43 43 的编译器gcc的windows版 xff0c win10真实可用 xff09
  • 常用传感器讲解十九--超声波感器(HC-SR04)

    常用传感器讲解十九 超声波感器 xff08 HC SR04 xff09 具体讲解 HC SR04超声波距离传感器的核心是两个超声波传感器 一个用作发射器 xff0c 将电信号转换为40 KHz超声波脉冲 接收器监听发送的脉冲 如果接收到它们
  • C++中vector作为参数的三种传参方式(传值 && 传引用 && 传指针)

    c 43 43 中常用的vector容器作为参数时 xff0c 有三种传参方式 xff0c 分别如下 xff1a function1 vector vec xff0c 传值 function2 vector amp vec xff0c 传引
  • 斯坦福机器狗的介绍

    添加链接描述 斯坦福机器狗的介绍 Stanford Doggo 现在已经能完成走路 慢跑 跳舞 跳跃等动作 xff0c 偶尔还能表演一下后空翻 机械结构组成 同轴机制 同轴机制 xff08 coaxial mechanism xff09 会
  • 基于ROS的车道线检测项目记录

    2020 09 06 任务 xff1a 传统OpenCV方法ROS版本改造 选取大神陈光的高级车道线检测方法进行改造 xff0c 总体逻辑是 xff1a 第一 创建订阅者 xff0c 接收摄像头发布的数据 xff0c 用cv bridge将